


FREE DELIVERY ABOVE $30


Product not found.
Product not found.
Product not found.
Product not found.
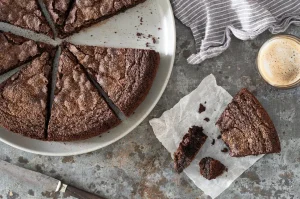
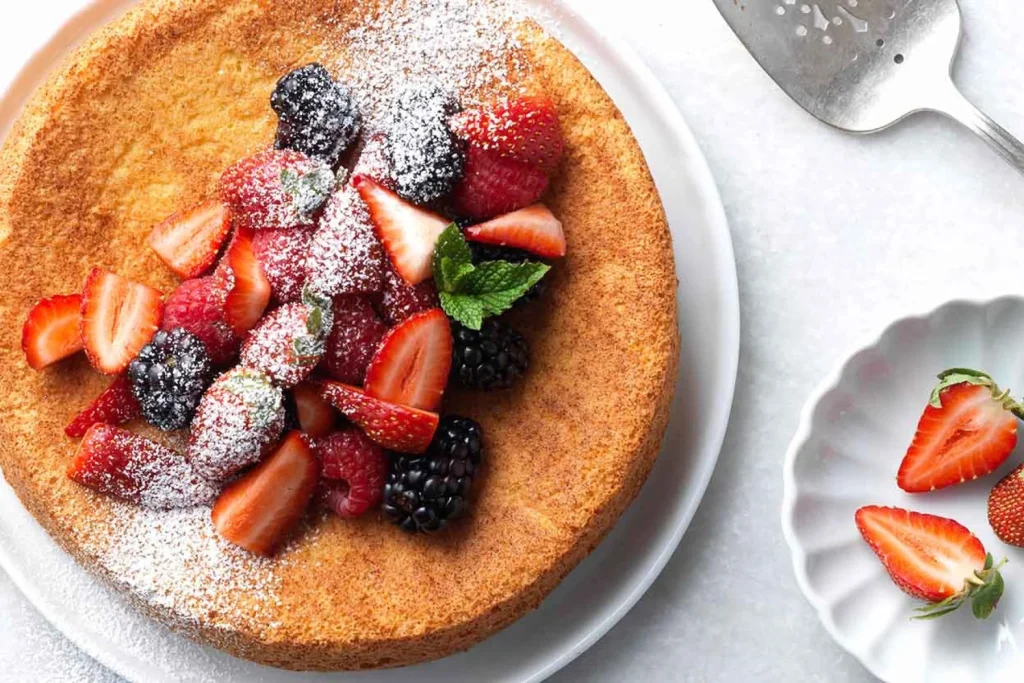
Baking 101
By: RedmanShop | January 12, 2025
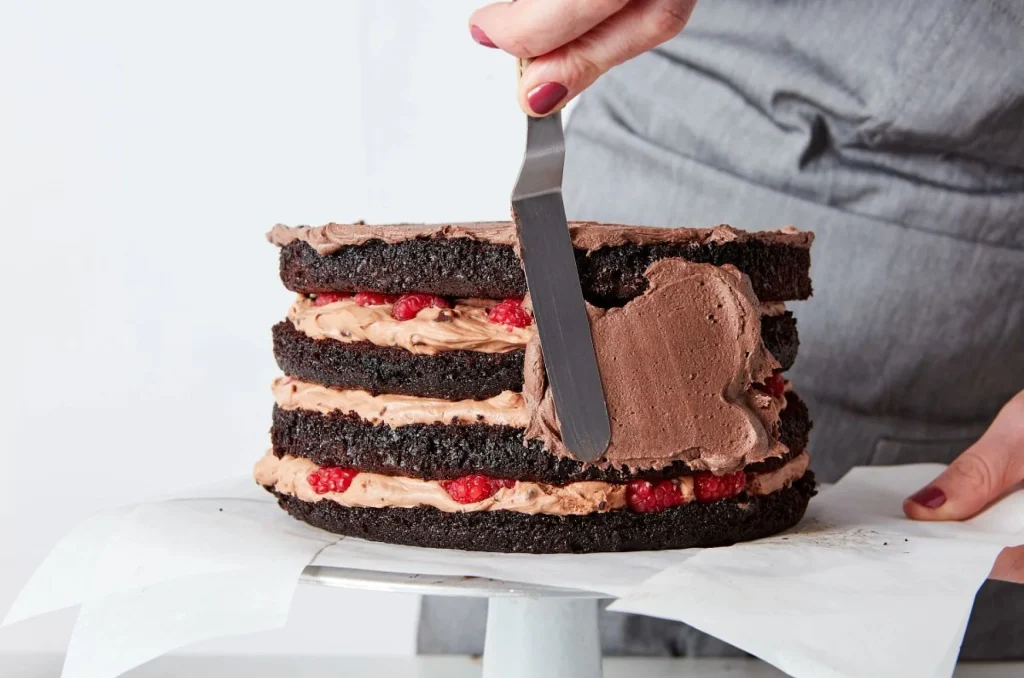
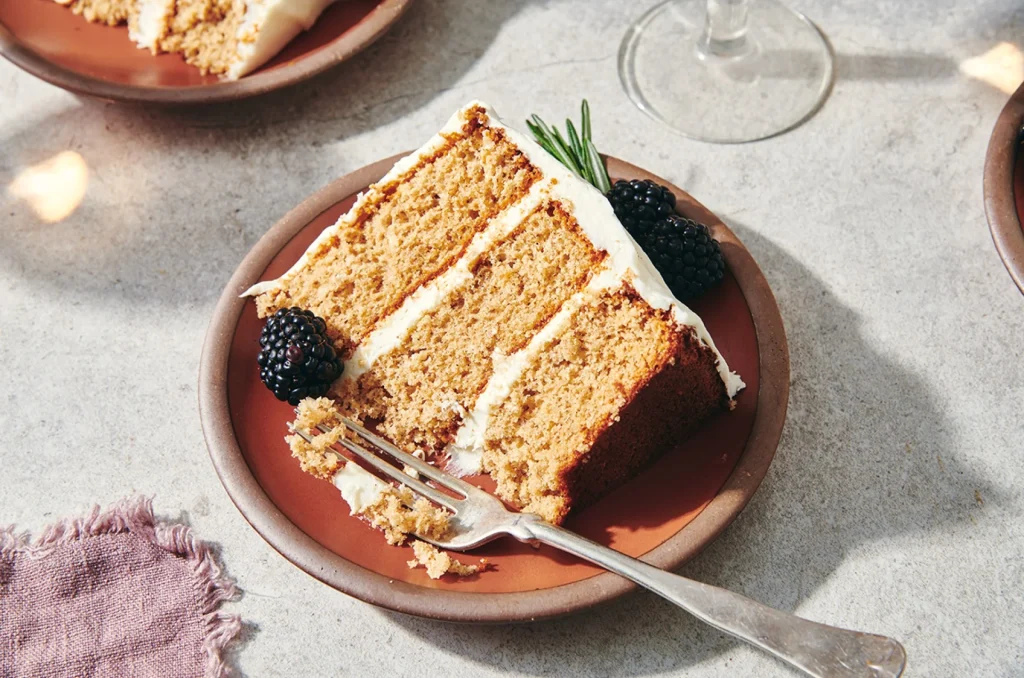
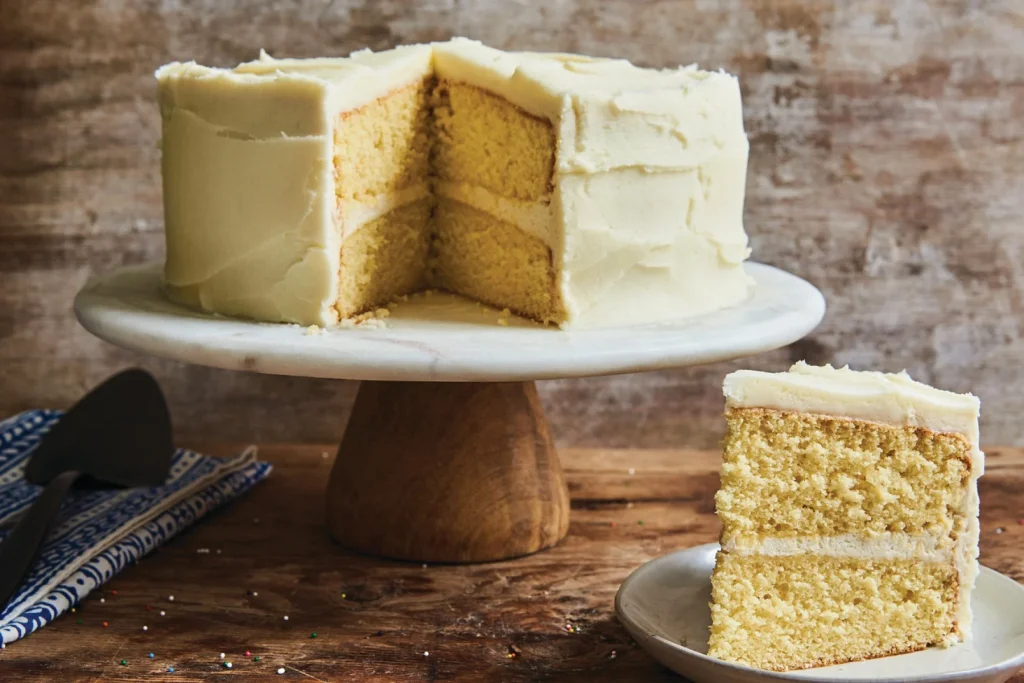
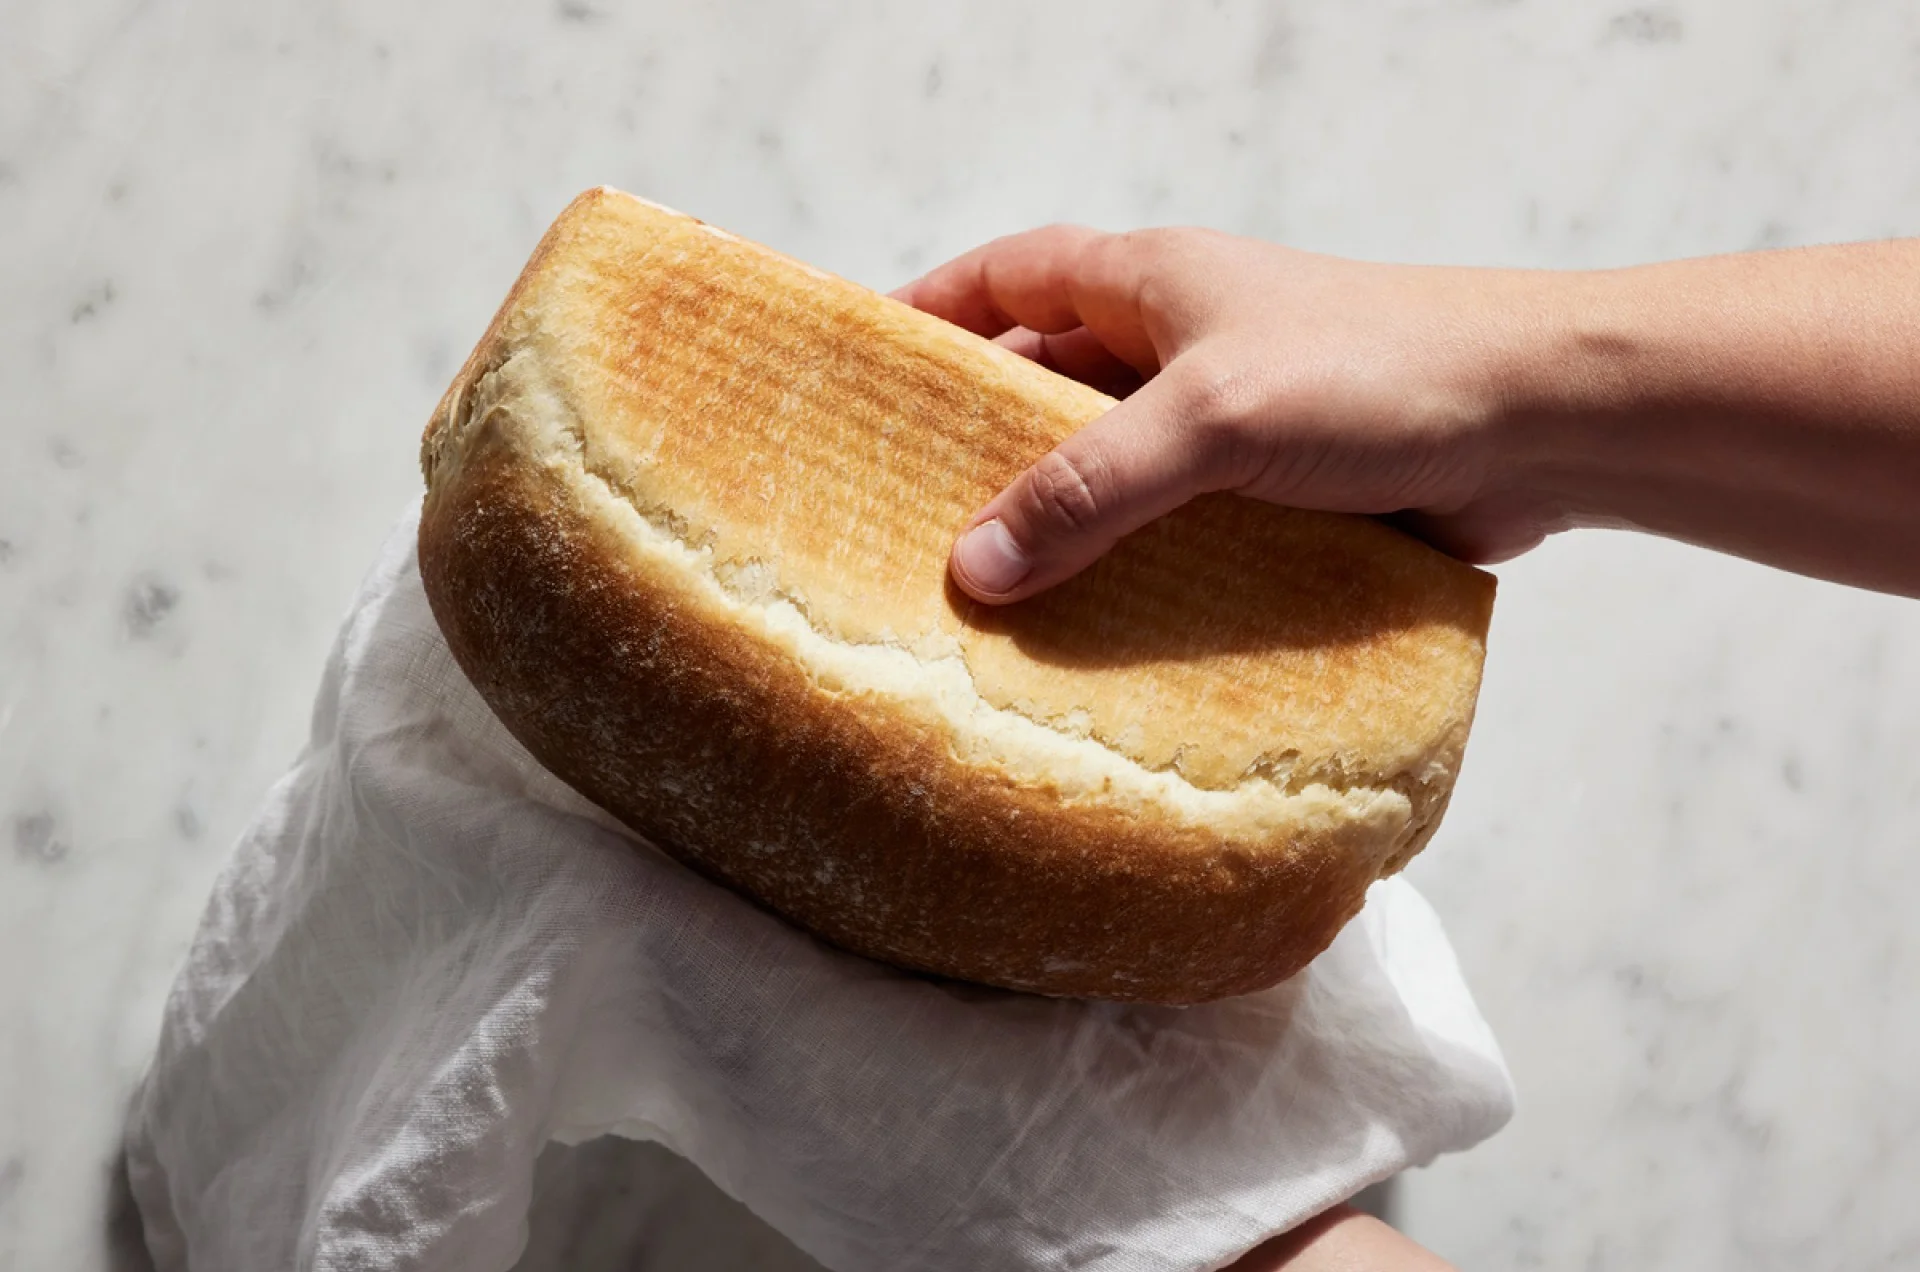
Frosting a cake can be intimidating, but if you break it down step-by-step, there’s nothing to fear. The right tools and techniques will guide you, taking you from naked layers to a frosted beauty without breaking a sweat. The key is to take your time and embrace imperfection. You’ve got this.
Patience makes perfect. Take the time to chill or freeze your baked layers before assembling the cake. The layers will be less fragile, and you’ll have more control and better results with frosting. While they’re chilling, line your serving plate with 2″ to 3″ wide strips of parchment paper.
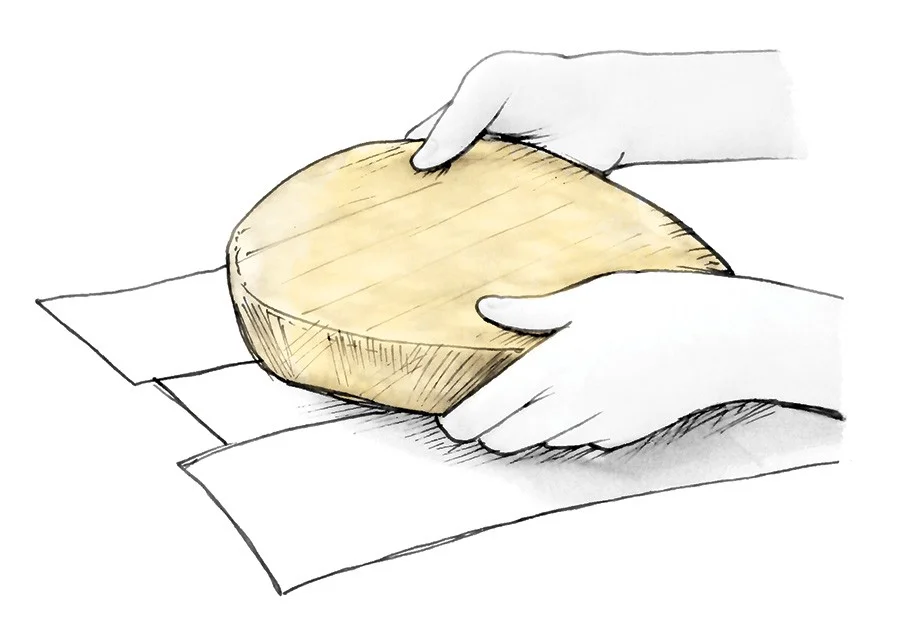
Trim any dome from the top of the first layer so the cake is flat, then flip it over and place it on your serving plate cut side down.
Pipe a rope of frosting around the outside edge of the cake layer. Refrigerate for 15 minutes so it will become firm. This “dam” keeps frosting or filling from bulging out the side of the finished cake. After the dam sets, fill the top of the layer.
Trim the next layer and place it cut side down over the first. Chill the cake again, if it isn’t cool to the touch.
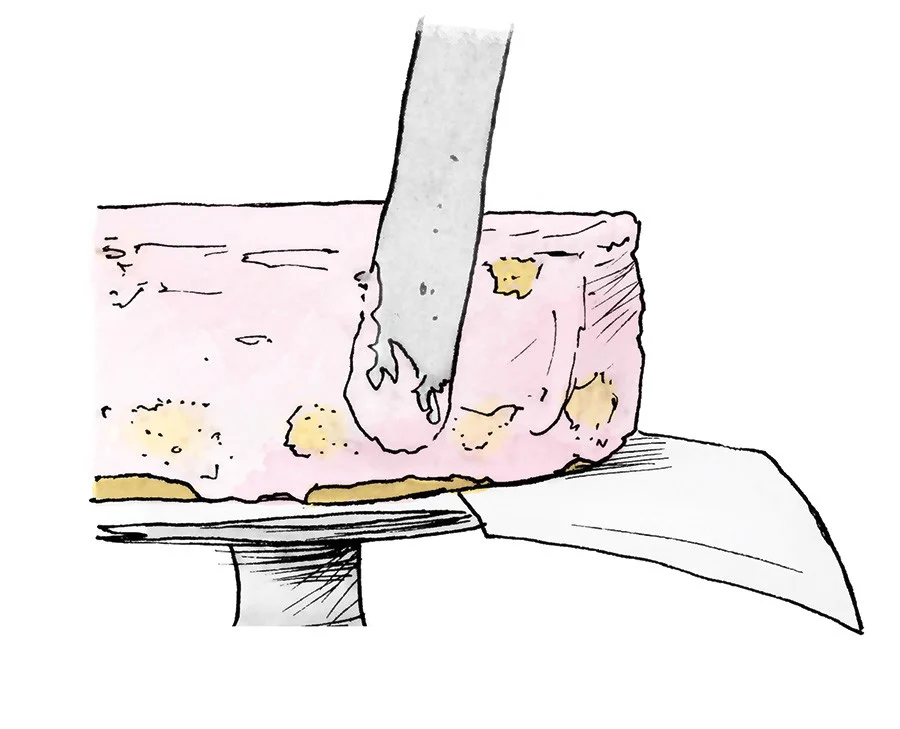
Smear a very thin coat of frosting on the sides and top of the cake.
This is called the crumb coat. It’s fine if it looks messy, and crumbs are showing through. Refrigerate the cake until you can touch the crumb coat without leaving a fingerprint, 20 to 30 minutes.
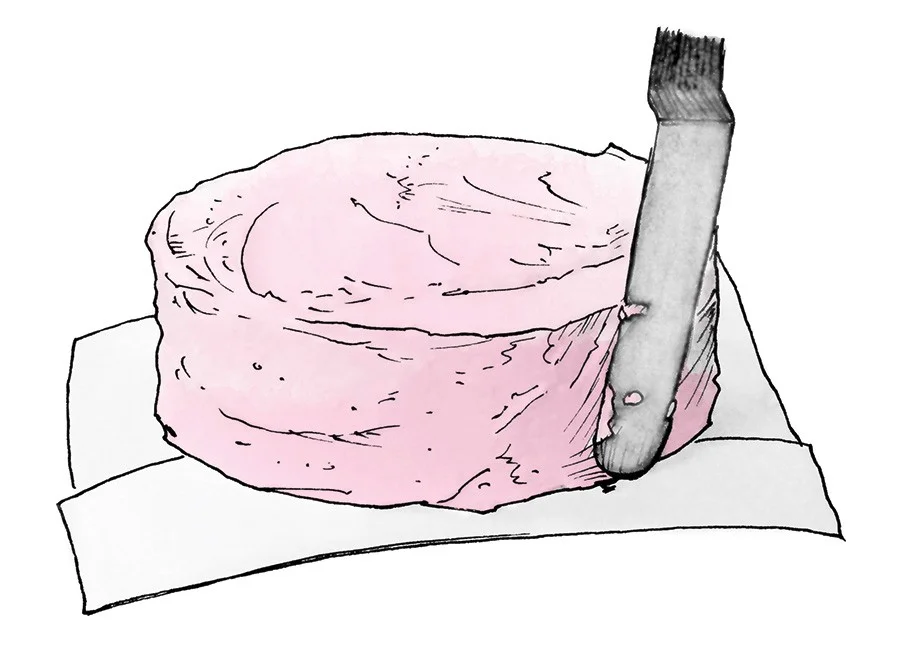
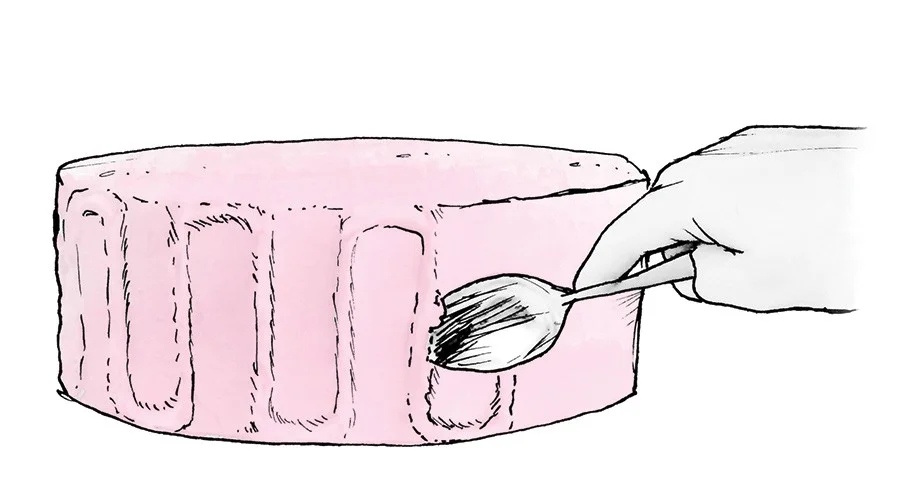
Once the crumb coat is firm, cover the top and sides of the cake with a finish coat of frosting. Gently remove the parchment paper strips. Decorate and embellish to your heart’s content.

By: RedmanShop | January 12, 2025
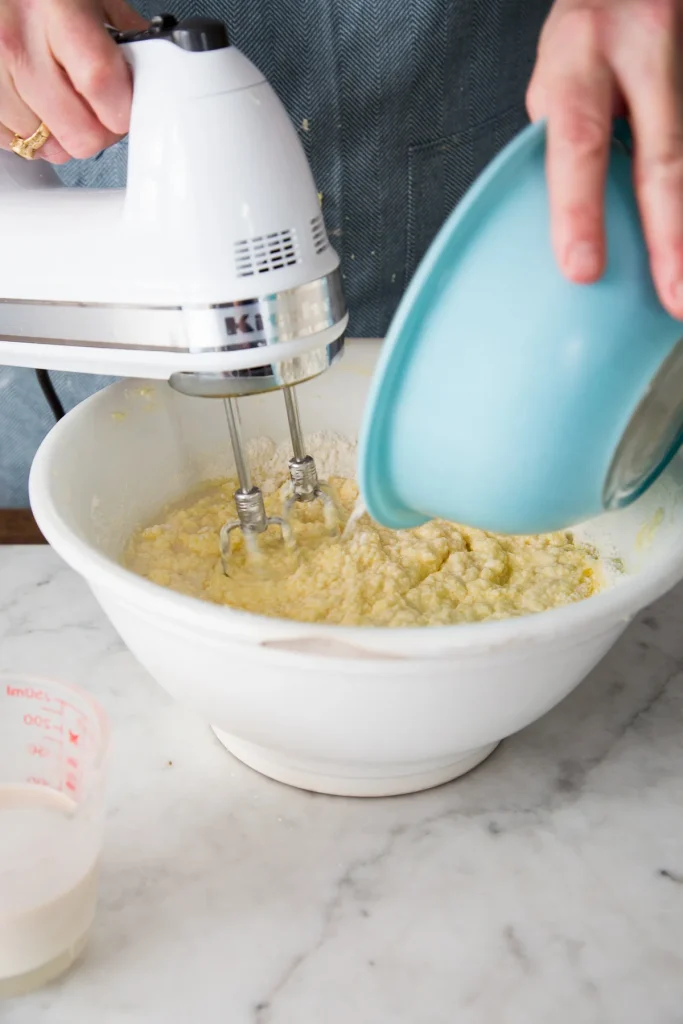
There are so many ways to mix up cake batter. Maybe you’ve always wondered why the many methods; maybe you never thought about it until now. But each technique is based on specific ingredients, and results in a different final product: from a light as air cake, to one that’s sturdy enough to hold up in wedding tiers.
Common ways you might see cake mixing methods written in a recipe:
Which way is “best”?
We’ve recently baked cakes using six of the top mixing methods. Read on to see just how different cake results can be, depending on the steps in which the batter is blended.
Cakes made with this method: Very moist; a great candidate for adding mix-ins.
Basically stir together and go, the blended method is the easiest of all cake-prep types. Blended cakes are typically made with oil rather than butter, since oil is much more easily incorporated with the rest of the ingredients. Blended cake batter tends to be more liquid than most; oftentimes the recipe will call to “pour” the batter into the pans, rather than scoop.
Example: Lemon Bliss Cake Cakes made with this method: Sturdy, yet soft textured. Easy to slice and stack in layers; also ideal for Bundt pans. This cake mixing method is a classic, and the most common.
The creaming method starts with beating the butter and sugar together until they’re lightened in color and fluffy.
Eggs are beaten in one at a time.
The creaming method then adds the dry and liquid ingredients alternately to the butter mixture.
The usual method is a third of the flour, half the milk, a third of the flour, the remaining milk, and finally the remaining flour; it’s helpful to scrape the bowl midway through this process.
Adding flour and liquids alternately ensures all the liquid (usually milk) will be thoroughly absorbed into the batter. If there’s a high amount of butter or other fat in the batter, it’s hard to get the liquid totally mixed in; the alternating technique helps reduce the percentage of fat overall (by adding some flour first). It also facilitates the formation of gluten, which binds the batter together.
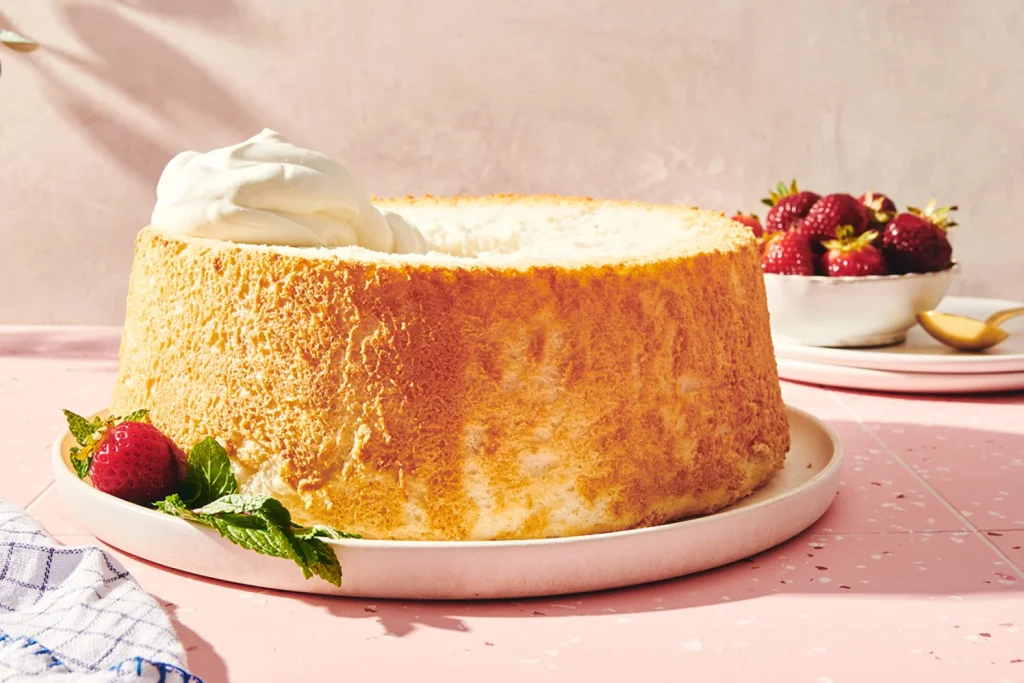
Example: Angel Food Cake
Cakes made with this method: Extremely light and airy. This high-rising, somewhat “resilient” cake slices best with a serrated knife or pronged angel food cutter. The leanest cake in the bunch, foam cakes contain little to no fat: i.e. no butter or shortening, and no egg yolks.

Like some sponge cakes, foam cakes contain no leavening, depending on air whipped into the egg whites for structure. The whites are whipped into stiff peaks, usually with cream of tartar added to help with stability and volume.
Flour is carefully folded in, leaving as much air in the batter as possible. Most choose to fold in the flour with a spatula, but we’ve found that using the whisk attachment (the one that just moments before whipped up those whites) incorporates it easily and gently.
Example: Golden Vanilla Cake
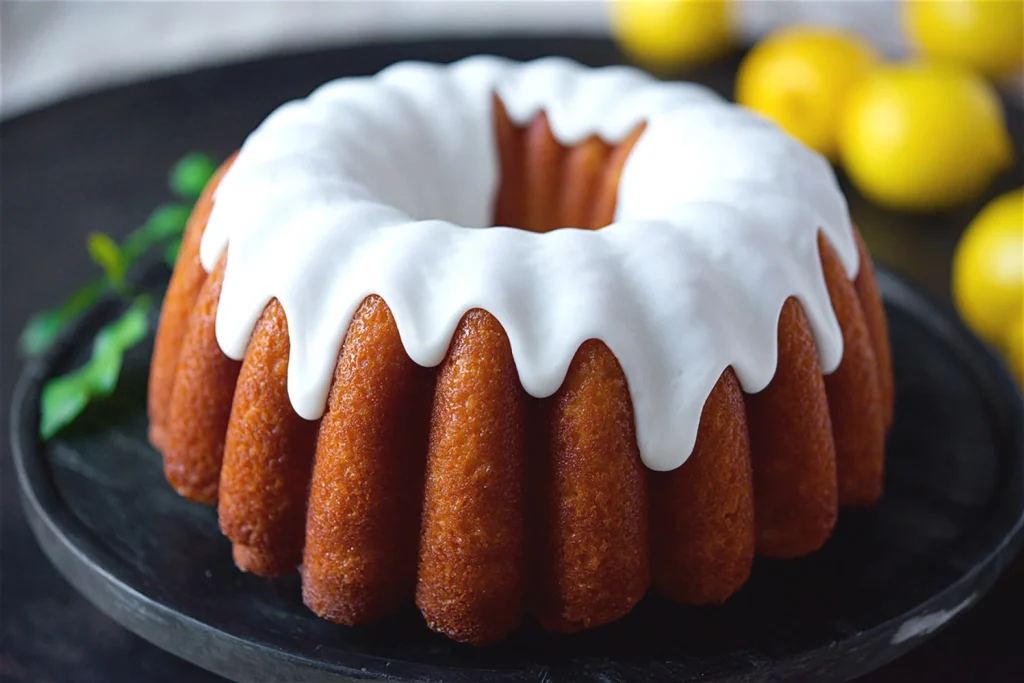
Cakes made with this method: Tighter textured, though still moist. A great candidate for tiers. The most sturdy of the cakes; slices with minimal crumbs. This moist and tender (yet sturdy) cake is an American favorite. Its slightly denser crumb makes it perfect for frosting as a layer cake. Making a cake using the paste method (also sometimes called “reverse creaming”) sounds complicated, but it’s actually one of the most simple techniques of the bunch.
Soft butter and room-temperature liquids are beaten into the dry ingredients until the texture is “sandy.” The butter-coated flour slows the formation of gluten (which starts once flour comes in contact with liquid), and results in a slightly more sturdy cake that still offers soft texture.
Once the batter reaches that crumbly, sand-like consistency, milk and any flavors are added. Then eggs are mixed in one by one. The batter, though pourable, is often thicker than other cake batters.
Example: Chef Zeb’s Hot Milk Cake
Cakes made with this method: Light and airy, with soft texture. Tend to compress slightly when stacked over two layers high. Mildly sweet, sponge cakes are high-rising and light as air, with the perfect degree of moistness.
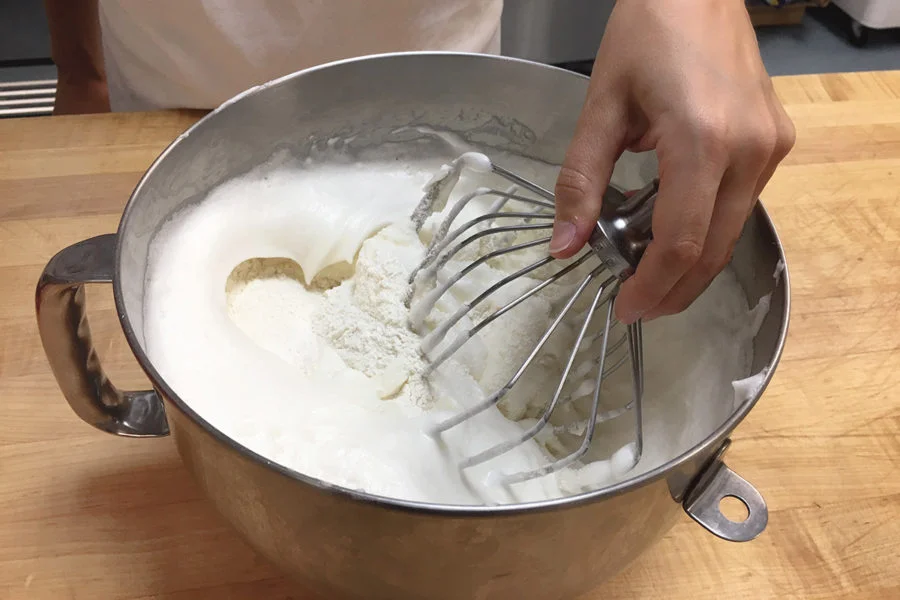
Sponge cakes can be made different ways. One way is beating egg yolks and sugar (or whole eggs and sugar) until a very thick foam-like batter is created. The batter is pale yellow in color, and falls off the beater in ribbons. Flour is then gently folded in. Another way is to whip the egg whites separately from the yolks until soft peaks form. The yolk/sugar mixture is beaten until light, flour is mixed in, and then egg whites are gently folded into that mixture. Either way the eggs are prepared, they provide leavening and loft for the sponge cake. This method dates back to before the widespread use of baking soda or powder, when trapped air was a cake’s only leavening.
The batter for sponge cake is very light, airy, and almost soup-like in consistency. Though it may be alarming, this is totally normal. It will bake up into the moist, delicious cake that we know as sponge.
Example: Strawberry Almond Flour Cake
Gluten-free cakes can be made any number of ways and with great success, much like their wheat-y counterparts. As with all recipes, be sure to read the directions carefully before starting. All puns intended, these methods really take the cake. Each one will create a totally different finished baked good – all equally delicious. Tell us, which of these cake-mixing methods do you usually use?
Want to take a deeper dive into cake baking? See our complete guide to cake and cupcakes.
By: RedmanShop | January 12, 2025
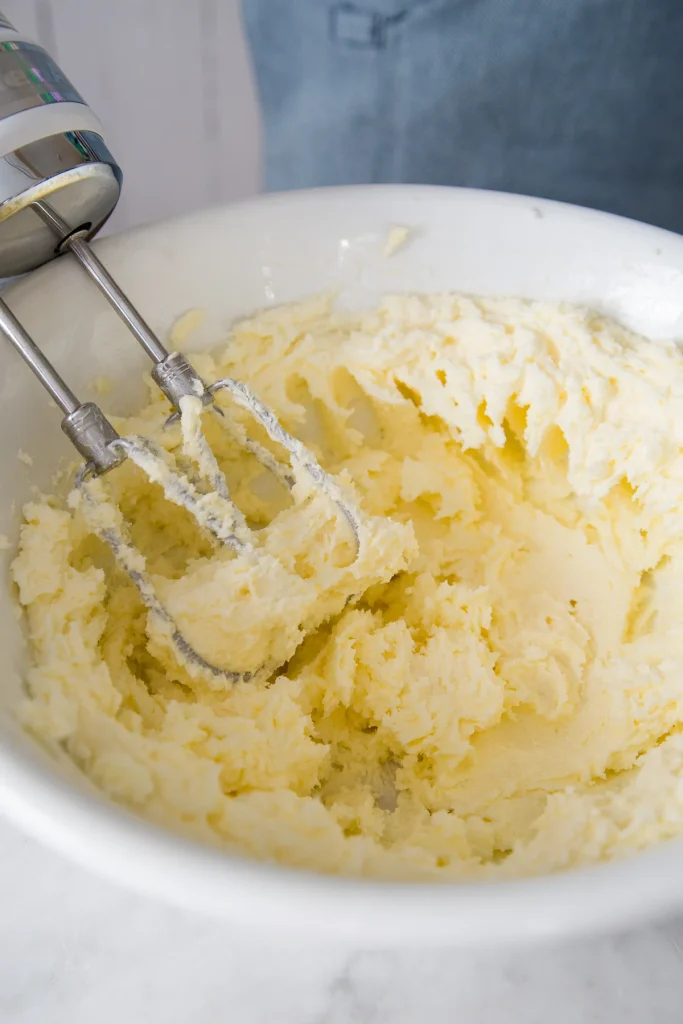
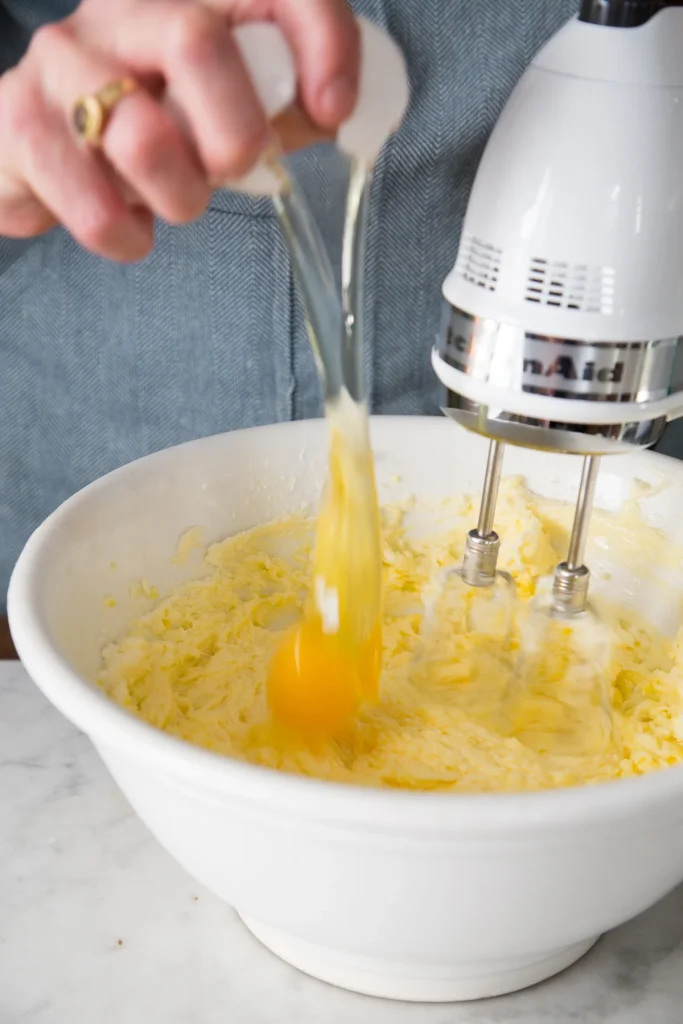
For many new bakers and a few veterans, too, cakes are some of the first baked goods we make on our own. We may start with a mix, but then when we realize how easy a cake can be, we branch out to from-scratch cakes and encounter a deceptively simple direction right off the bat: “Cream the softened butter and sugar until light and fluffy.”
In creaming the butter and sugar together, you are using the sugar to aerate the butter and fill it with bubbles that can capture the gasses released by your leavener (usually baking soda and/or baking powder). The more fine bubbles you have in your network, the lighter in texture your cakes will be and the finer the crumb. This is true for your muffins as well, while it makes your cookies light and crisp instead of hard and dense.
Just like Goldilocks, we can encounter a variety of issues when dealing with this phrase. Too hard, too soft, and just right. Just what does softened butter look like? Should it be melted? How long do you beat? Should I set my mixer to low or high? How do I know when it’s right?
Not too hard, not too soft — just right.
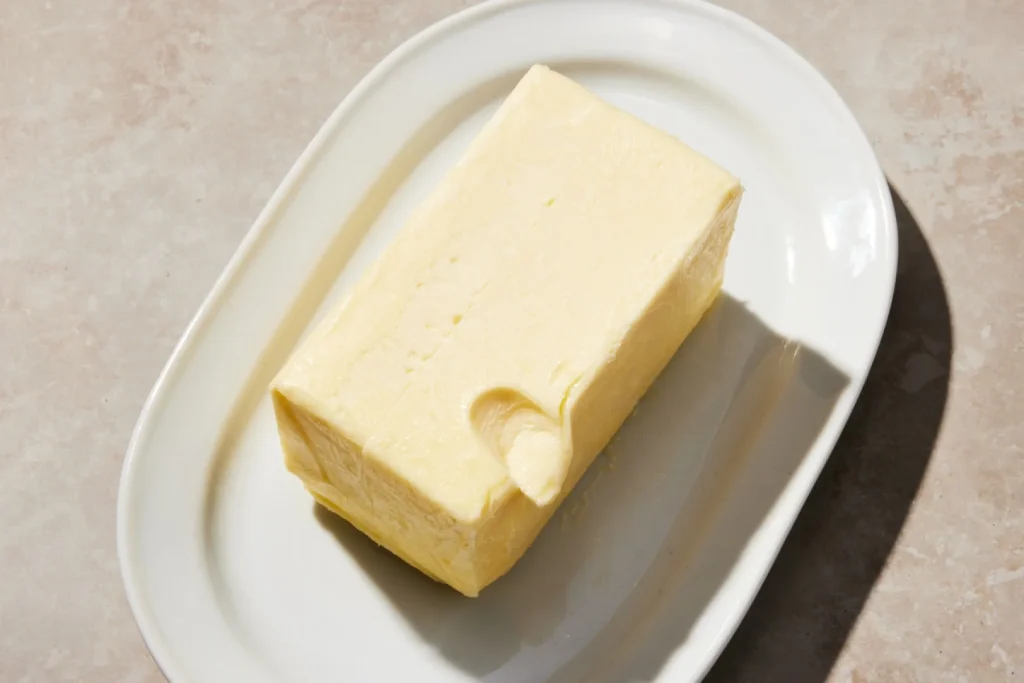
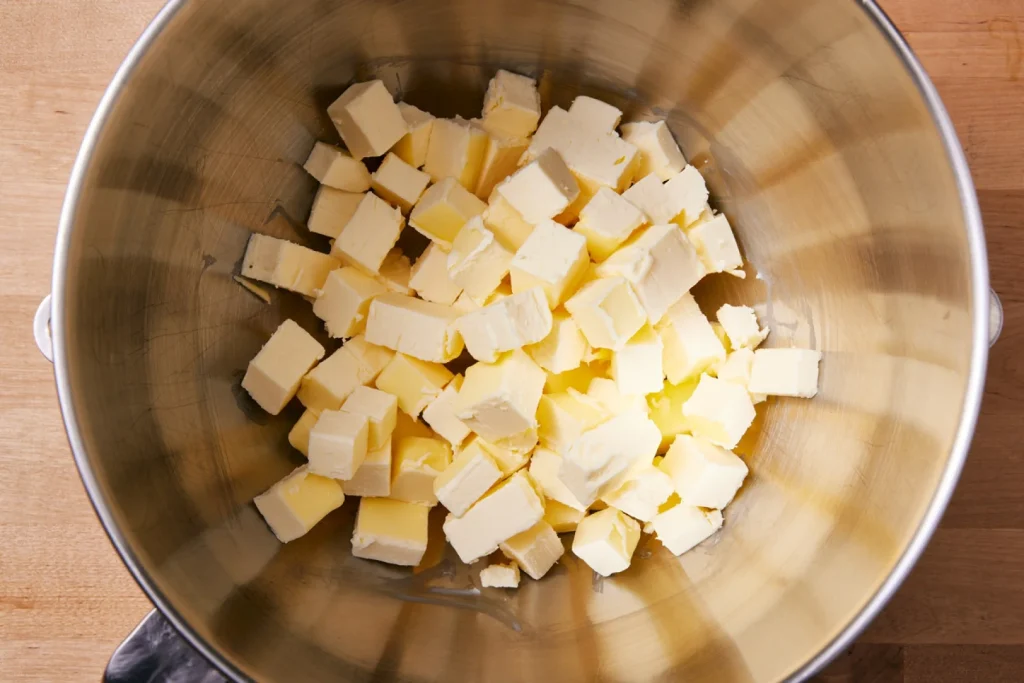
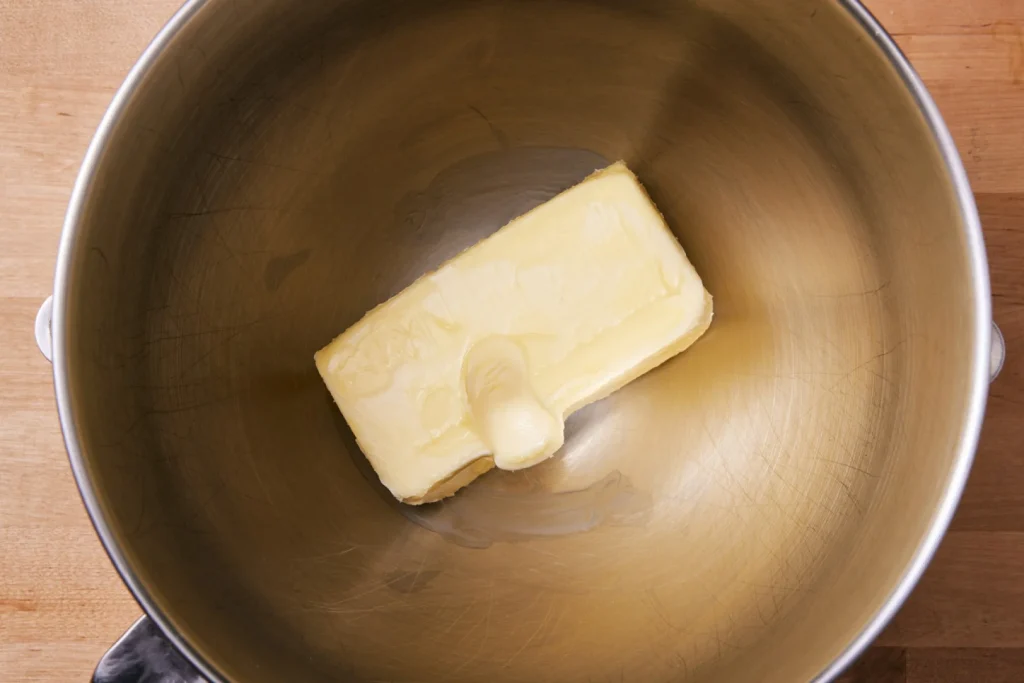
Your butter should be at room temperature before creaming. But what exactly does that mean? You should be able to press an indent into the butter with one finger, as if you were pressing it into clay. The butter should not be so warm that it’s greasy; it should still be slightly cool, with a bit of resistance when you press it.
The best way to get your butter to room temperature is to leave it out on the counter for a few hours. But if you need to get butter to room temperature quickly? We tested tons of different methods to determine the best one.
Next, let’s explore what will happen if you cream your sugar with butter that’s too cold, too warm, and just right. Up first, butter that’s too cold.
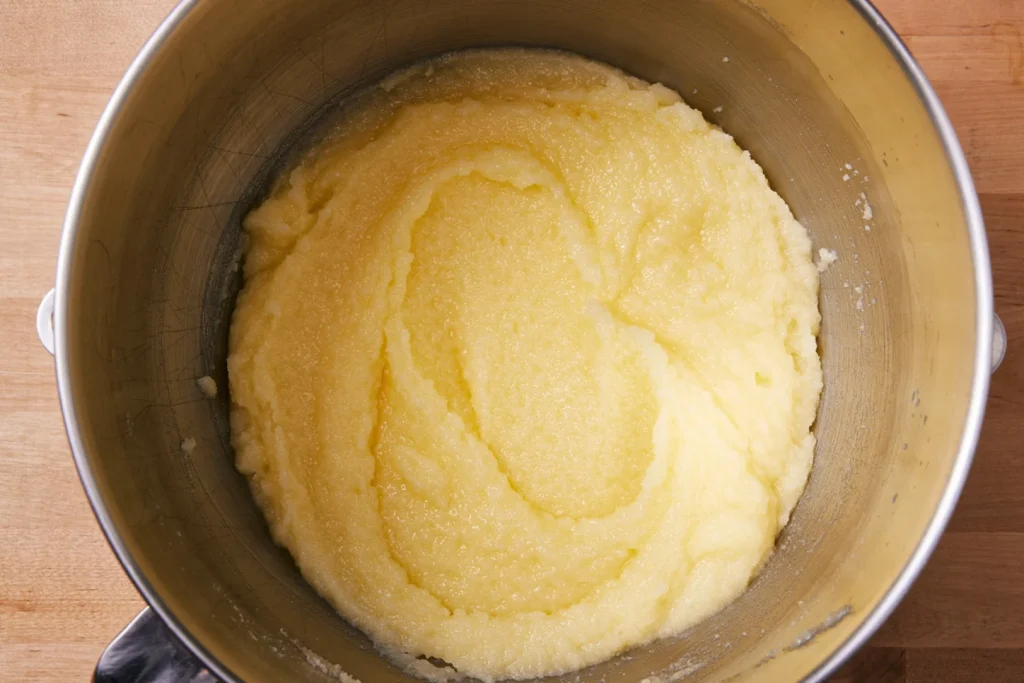
Again, the main reason you want to cream butter and sugar is to use the sugar crystals to punch little holes in the butter and have those holes capture air. Butter that is too cold won’t expand very easily, and it’ll never capture much air. The result? Heavy and dense, the creamed butter will resemble a chunky, grainy spread that’s the consistency of natural peanut butter. There’s also little or no change in color. Properly creamed butter and sugar will be pale yellow in color, but not white (more on this later).
Sugar creamed with cold butter is chunky and dense.
If the butter is too soft or melted, the air bubbles will be created but then will collapse again. This causes a greasy, wet mixture that will result in heavy, soggy cakes. Any air bubbles you’ve managed to create will also be knocked out as soon as the eggs and flour are added. (As a side note, this is also what happens if you try to cream oil and sugar. Leave the oil for recipes that don’t call for the creaming method.)
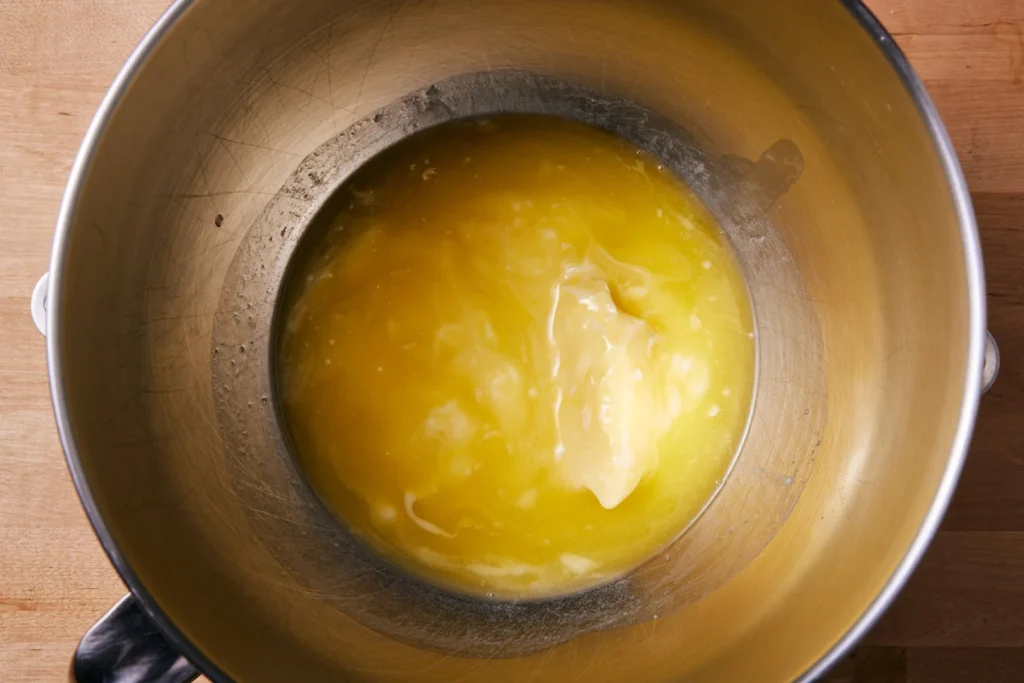
Sugar creamed with warm or melted butter is grainy and greasy.
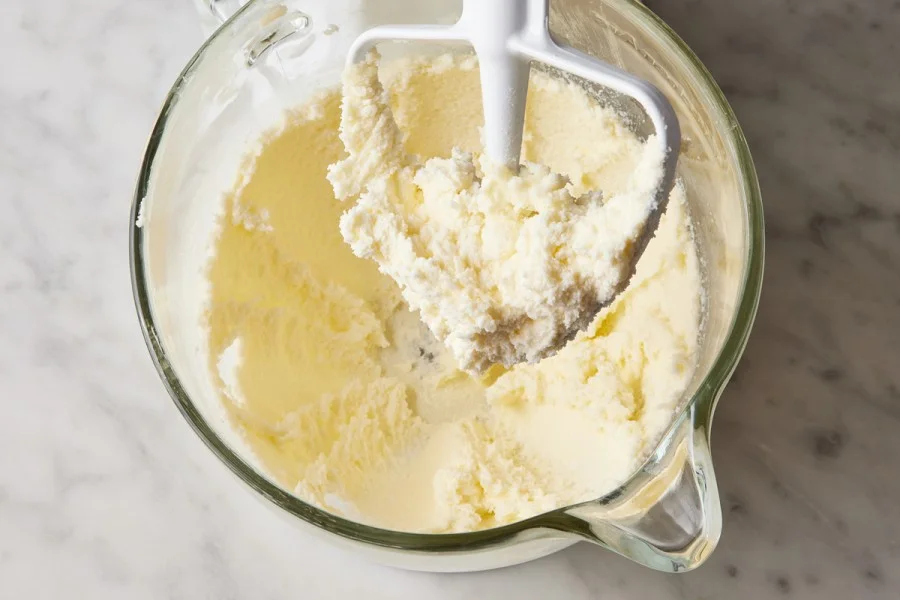
Now that we’ve seen both extremes, let’s check out the results when the butter is at the right temperature. The mixture is lightened in color, it’s visibly fluffy, and it’s not clinging to the sides of the bowl.
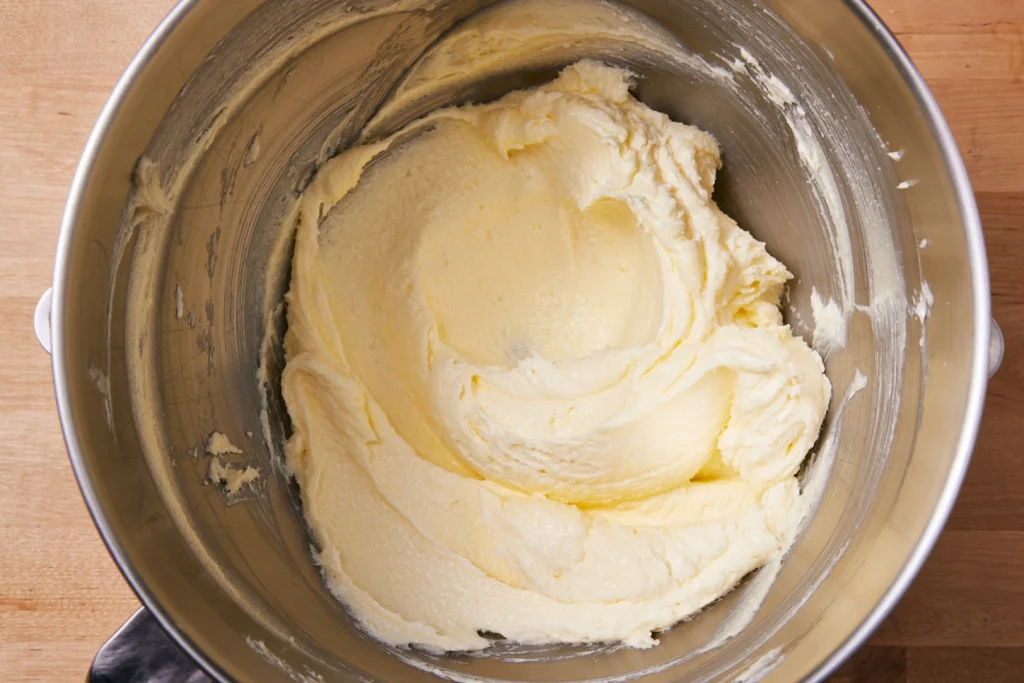
Sugar creamed with room temperature butter is pale and fluffy.
Let’s look at the three results side by side. Starting on the left: too cold and the mixture sits in a lump. Too warm, and the mixture spreads out and has an oily layer. Finally, properly creamed, the mixture sits up tall and has visible fluffy peaks.
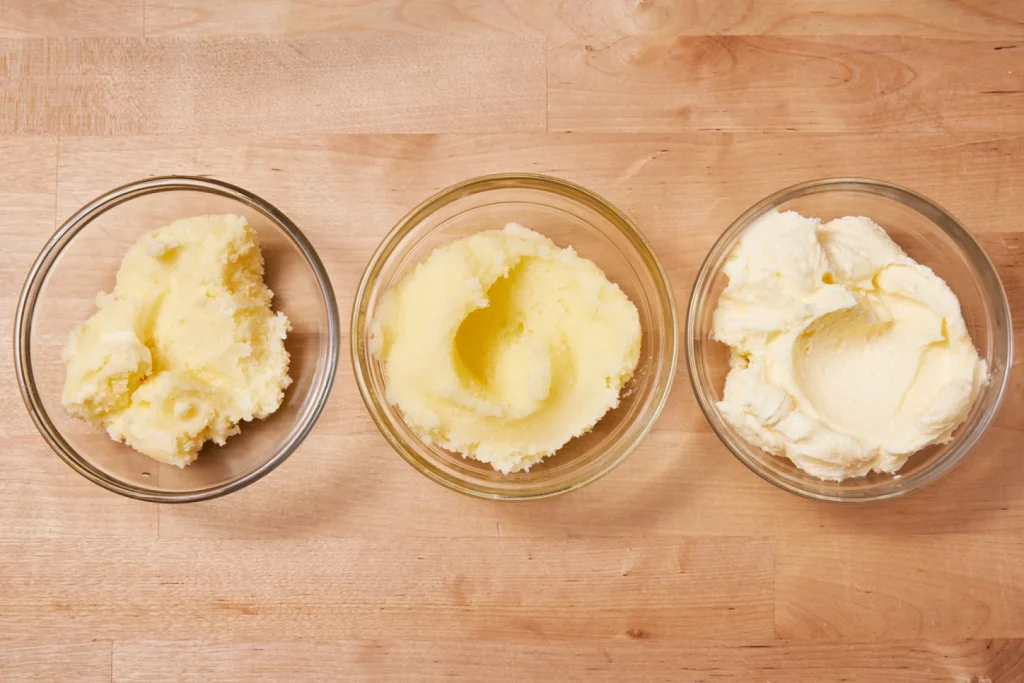
From left to right: sugar creamed with cold butter, warm butter, and room temperature butter.
Besides looks, the feel of each mixture will be different as well. Under-creamed and your mix will feel like wet sand or damp cornmeal. Over-creamed, and your mix will have the feel of oil and sugar on your fingers, rather like a facial scrub. Your well-creamed mix will be moist and light and the sugar will be nearly dissolved. You’ll barely feel any grit when you rub it between your fingers.
Of course, having correctly softened butter is just one part of the equation, albeit a big one. Mixing at too high or too low a speed and for too short or long a time will also wreak havoc with your creaming. With the advent of the more powerful stand mixers that we use today, gone are the days of having to whip the butter and sugar mixture on high speed for several minutes to achieve good results. Instead, a moderate speed (typically speed 3 to 4 on a stand mixer) for 2 to 3 minutes is sufficient to get the aeration you’re looking for, being sure to scrape the bowl halfway through.
If you under-cream your butter and sugar mixture, it will remain dense, grainy, and dark in color:
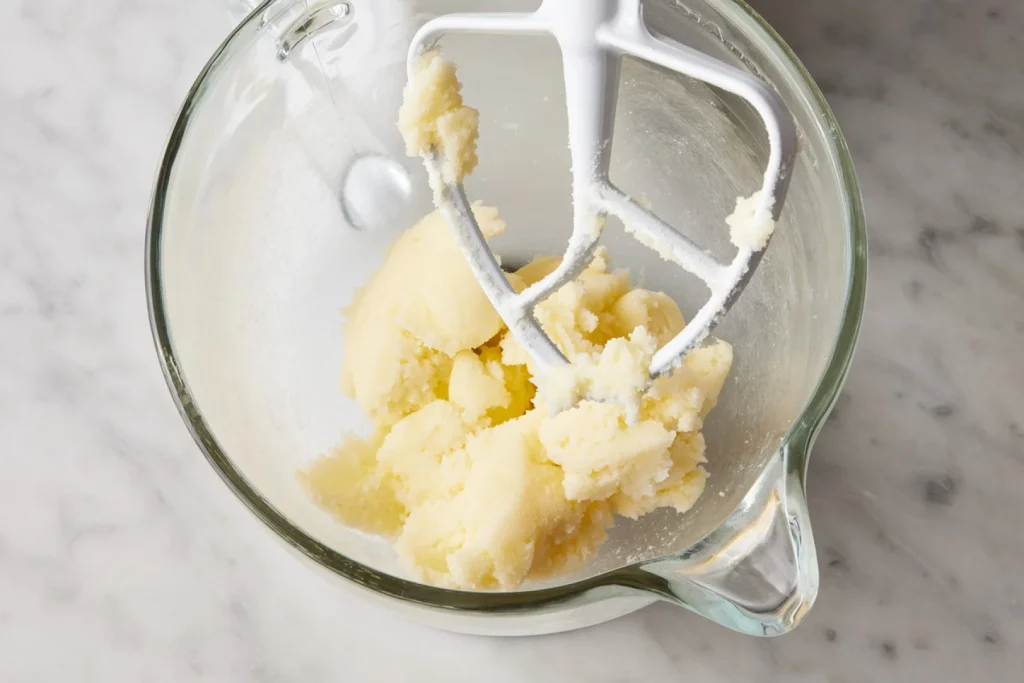
Under-creamed butter and sugar
If you under-cream your butter and sugar mixture, it will remain dense, grainy, and dark in color.
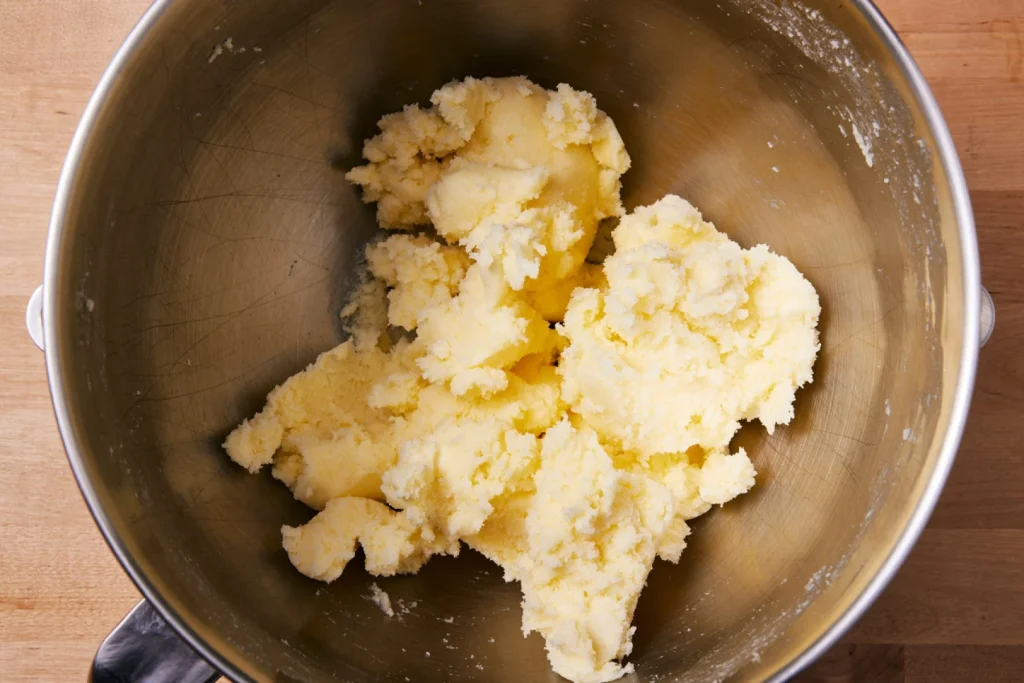
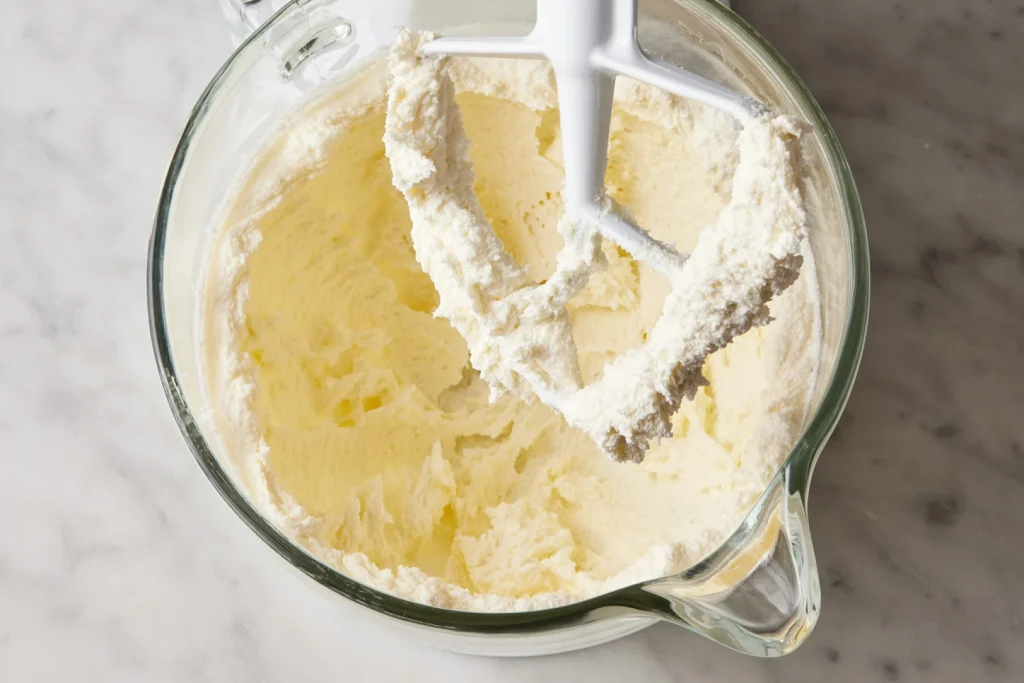
Perfectly creamed butter and sugar should be light, fluffy, and pale in color (but not white).
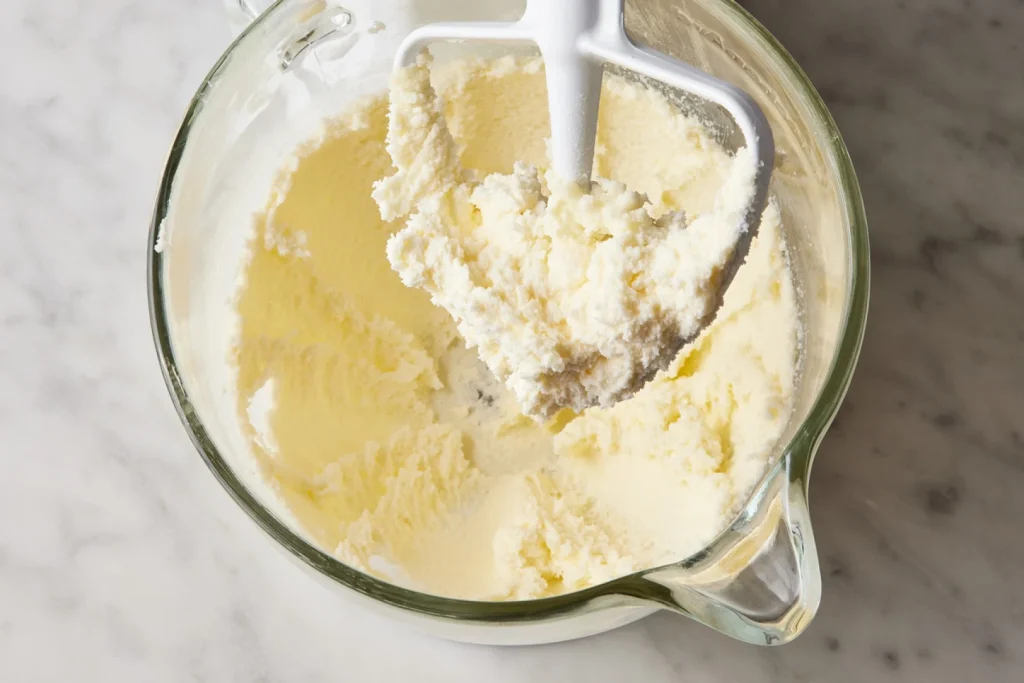
Perfectly creamed butter and sugar
Perfectly creamed butter and sugar should be light, fluffy, and pale in color (but not white).
If you beat too long and hard, the mixture will be over-creamed, becoming nearly white in color. Because it’s too aerated, it can result in dense, gummy streaks in your cake when baking.
Over-creamed butter and sugar.
Unfortunately, if the butter and sugar has gone this far there’s no going back. We hope you’ve found this information helpful. A picture is worth a thousand words, they say, and we hope these photos and our video will help you achieve the cakes and bakes of your dreams.

By: RedmanShop | January 12, 2025
Yeast is a single-cell organism, part of the fungi kingdom. The yeast we use most often today, Saccharomyces cerevisiae, is one of the oldest domesticated organisms known to mankind: It’s been helping humans bake bread and brew alcohol for thousands of years. Fittingly, the Latin translation of Saccharomyces cerevisiae is “sweet fungi of beer.”
Saccharomyces cerevisiae is just one strain of the more than 1,500 identified species of yeast. But wait, there’s more — literally. Those 1,500 identified yeasts are just an estimated 1% of the yeast population in the world; most species remain as yet unnamed.
In order to have a reliable supply of yeast on hand for all of our baking needs, it’s necessary for manufacturers to “domesticate” wild yeast — stabilizing it, and in the process making it 200 times stronger than its wild counterpart.
Plant scientists working with a yeast manufacturer identify certain characteristics of wild yeast that they decide are desirable, isolate them, and then replicate them. The resulting yeast is given a “training” diet (such as molasses or corn syrup) to make it reproduce and grow. Once the cells have replicated to a critical mass — a process that generally takes about a week — they’re filtered, dried, packaged, and sent off to the market.
Yeast makes bread rise. Just as baking soda and baking powder make your muffins and cakes rise, yeast makes breads of all kinds rise — sandwich loaves, rolls, pizza crust, artisan hearth breads, and more.
If you’re baking with yeast, here’s how to tell if your bread dough has risen enough.
Since yeast doesn’t reproduce without a good supply of oxygen, it stops reproducing once it’s in dough. Instead, it starts to eat: Sugar (sucrose and fructose) is its favorite food. If there is sugar in the dough, that’s what the yeast eats first; once that’s gone, enzymes convert the starch in flour into sugars for the yeast to consume; thus flour is capable of providing yeast with a continuous food source.
The byproducts of feeding yeast are carbon dioxide, alcohol, and organic acids. Carbon dioxide released by yeast is trapped in bread dough’s elastic web of gluten; think of blowing up a balloon. Alcohol and organic acids disperse throughout the dough, enhancing baked bread’s flavor. As long as moisture and food are available, yeast will continue to eat and produce carbon dioxide, alcohol, and organic acids. If your bread stops rising, it’s usually not because the yeast isn’t working (or has died); it’s because the yeast has run out of food or the gluten has somehow become “leaky” and begun to deteriorate, failing to retain carbon dioxide.
If you’ve ever baked bread, you’ve probably noticed that sometimes yeast seems to work more quickly than other times. Yeast, like any living organism, is happiest when it’s in a comfortable environment. For yeast, this means plenty of food and moisture; the right pH (acid balance); and the right amount of warmth. Yeast prefers temperatures between 70°F and 100°F; for convenience’s sake, and to produce the most flavorful loaf, it’s best to keep rising conditions on the cooler end of that range, rather than warmer, which can cause the dough to rise too quickly, before it’s had a chance to develop its full flavor.
Salt and sugar can both slow down yeast activity. Each of them is osmotic, meaning they can pull moisture out of yeast cells, thus adversely affecting how the yeast functions. We add salt to yeast dough both for flavor, and to moderate yeast’s work; we don’t want our loaves rising too fast. (See more here: Why is salt important in yeast bread?) Sugar is optional; a little bit makes yeast happy, but too much — generally, more than 1/4 cup per 3 cups of flour — slows yeast down. Cinnamon is also a yeast inhibitor — you can’t use more than 1 teaspoon per 3 cups of flour in a dough without it slowing down the rise significantly.
There are all kinds of reasons why bread fails to rise; weak or dead yeast is one of them. Though you may have just purchased your yeast, it may not have been stored or rotated correctly prior to your purchasing it so that it isn’t, in fact, as new as you think it is. A vacuum-sealed bag of yeast stored at room temperature will remain fresh indefinitely. Once the seal is broken, it should go into the freezer for optimum shelf life. (See “What’s the best way to store yeast?” below.)
A vacuum-sealed bag of yeast stored at high temperatures, however — e.g., in a hot kitchen over the summer, or in a hot warehouse before delivery — will lose its effectiveness fairly quickly. After a while, if stored improperly, yeast cells will die. And if you use dead (or dying) yeast in your bread, it won’t rise.
To make sure your yeast is active before you start mixing, see our blog post: How to test yeast for freshness. Another reason yeast might not work: You may have killed it by using overly hot water in your recipe; water hotter than 139°F will kill yeast. But don’t stress too much about temperature; 139°F is way hotter than is comfortable to the touch. If you stepped into a bathtub of 139°F water, you’d leap out fast. So long as the water you combine with your yeast feels comfortable to you, it’ll be comfortable for the yeast, too.

You may find older recipes calling for “1 packet active dry yeast.” A packet used to include 1 tablespoon of yeast; currently, it’s closer to 2 1/4 teaspoons, since improved manufacturing methods now produce stronger, more active yeast.
The amount of yeast you use in your bread dough has a significant bearing on how quickly it’ll rise. By reducing the yeast, you ensure a long, slow rise, one more likely to produce a strong dough able to withstand the rigors of baking. The more yeast in a recipe initially, the quicker it produces carbon dioxide, alcohol, and organic acids. Alcohol, being acidic, weakens the gluten in the dough, and eventually, the dough becomes “porous” and won’t rise, or won’t rise very well.
By starting with a smaller amount of yeast, you slow down the amount of carbon dioxide, alcohol, and organic acids being released into the dough, thus ensuring the gluten remains strong and the bread rises well — from its initial rise in the bowl to its final rise in the oven. Remember that this slow rise extends to the shaped loaf, as well as the dough in the bowl. Once you’ve shaped your loaf, covered it, and set it aside to rise again, it may take 2 hours or more, rather than the usual 1 to 1 1/2, to rise fully and be ready for the oven.
Here are some guidelines to get you started. If you’re an occasional bread baker, cut back the usual 2 to 2 1/4 teaspoons of instant yeast to 1/2 to 1 teaspoon, depending on how long you want to let the dough ferment before the final shape-rise-bake process. 1/2 teaspoon would give you lots of flexibility, such as letting the dough “rest” for 16 to 20 hours; 1 teaspoon would be a good amount for an all-day or overnight rise (10 hours or so, at cool room temperature). If you’re using active dry yeast, which isn’t as vigorous as instant yeast, we’d up the range to 3/4 to 1 1/2 teaspoons.
You can increase the size of most bread recipes by simply doubling, tripling, etc. all of the ingredients, including the yeast. Depending on the recipe and rising time, you may use as little as 1 teaspoon, or up to 2 1/4 teaspoons (sometimes more) of instant yeast per pound (about 4 cups) of flour.
That being said, many home recipes, particularly older ones, use more yeast than this; so when you double or triple the yeast, you may find that your dough is rising too fast — faster than you can comfortably deal with it. In addition, if you’ve increased your recipe by five times or more, and also increased the yeast by five times, keep in mind the time it will take you to shape the dough. You may find the rising dough outpaces your ability to get it shaped and baked. If that’s the case, make a note to reduce the amount of yeast next time.
In days gone by there was a significant difference between active dry yeast and instant yeast. Today, the difference is minimal, and the two can be used interchangeably — with slightly different results. Let’s look at active dry yeast first.
Originally, the classic active dry yeast manufacturing process dried live yeast cells quickly, at a high temperature. The result? Only about 30% of the cells survived. Dead cells “cocooned” around the live ones, making it necessary to “proof” the yeast — dissolve it in warm water — before using.
These days, active dry yeast is manufactured using a much gentler process, resulting in many more live cells. Thus, it’s no longer necessary to dissolve active dry yeast in warm water before using — feel free to mix it with the dry ingredients, just as you do instant yeast.
Active dry yeast, compared to instant yeast, is considered more “moderate.” It gets going more slowly, but eventually catches up to instant — think of the tortoise and the hare. Many bread-bakers appreciate the longer rise times active dry yeast encourages; it’s during fermentation of its dough that bread develops flavor.
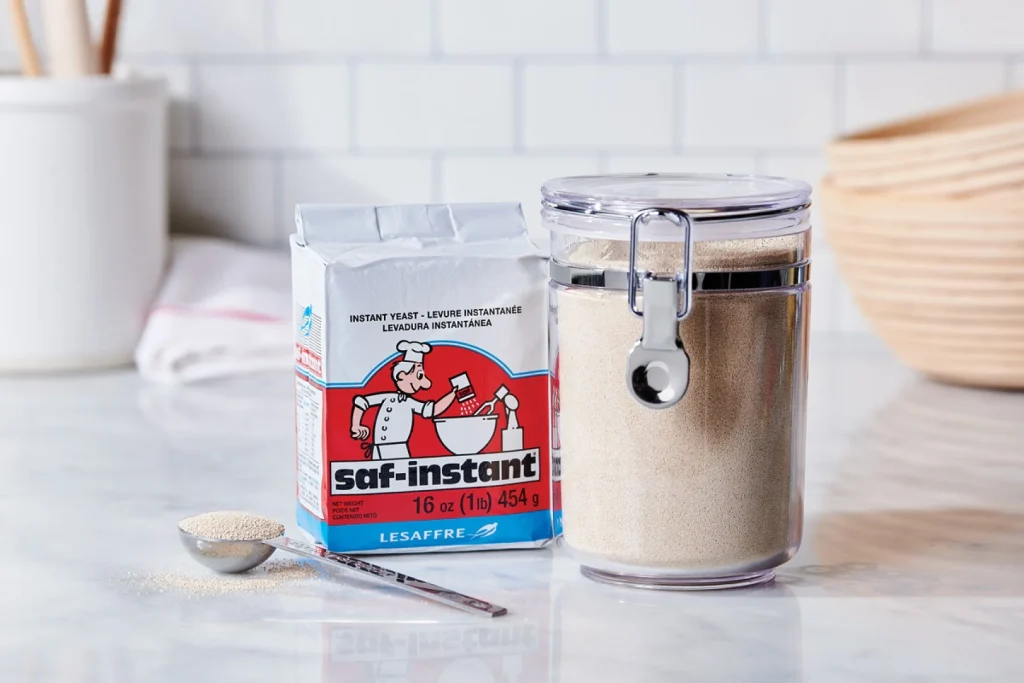
Fleischmann’s and Red Star are the two brands of active dry yeasts you’re most likely to see in your supermarket.
This yeast is manufactured to a smaller granule size than active dry. Thus, with more surface area exposed to the liquid in a recipe, it dissolves more quickly, and gets going faster than active dry. While you can proof it if you like, it’s not necessary; like active dry yeast, simply mixing it into your bread dough along with the rest of the dry ingredients works just fine.
One caveat: In dough that’s high in sugar (generally, more than 1/4 cup sugar per 3 cups of flour), the sugar evens things out, and instant yeast and active dry yeast will perform the same. (For very sweet breads, you might want to consider using SAF Gold Instant Yeast; for more on that, read below.)
Yes, they can be substituted for one another 1:1. We’ve found that active dry yeast is a little bit slower off the mark than instant, as far as dough rising goes; but in a long (2- to 3-hour) rise, the active dry yeast catches up. If a recipe using instant yeast calls for the dough to “double in size, about 1 hour,” you may want to mentally add 15 to 20 minutes to this time if you’re using active dry yeast.
When dough is rising, you need to judge it by how much it’s risen, not how long it takes; cold weather, low barometric pressure, and a host of other factors affect dough rising times, so use them as a guide, not an unbreakable rule.
One time when you might not want to use instant and active dry yeasts interchangeably is when you’re baking bread in a bread machine. Since bread machines use a higher temperature to raise dough, substituting instant for active dry yeast 1:1 may cause bread to over-rise, then collapse. When baking in the bread machine and substituting instant yeast for active dry, reduce the amount of instant yeast by 25%.
Bread machine yeast and instant yeast are the same yeast. RapidRise, Fleischmann’s branded instant yeast, is also an instant yeast, but a different strain than SAF or Red Star.
We find RapidRise is faster out of the gate than SAF or Red Star, but it gives out sooner. And since we like to give our loaves leisurely rises (a long rise brings out bread’s flavor), we like SAF or Red Star.
SAF Gold Instant Yeast, another SAF variety, is an “osmotolerant” yeast, perfect for sweet breads and any dough with a high amount of sugar. SAF Gold works best when the amount of sugar is between 10% and 30% of the amount of the flour, by weight (this is called a “baker’s percentage”). So, for a 3-cup-flour loaf (360g flour), you’d choose SAF Gold if the sugar is greater than 3 tablespoons, or up to about a heaping 1/2 cup. Understand that the greater the amount of sugar, the more slowly your dough will rise.
How does SAF Gold work? Sugar likes to absorb water; and when there is sugar in bread dough, it pulls water away from yeast, leaving the yeast thirsty. The yeast cells in SAF Gold are bred to require less liquid to function, so they’re better able to withstand sugar’s greedy ways with water.
SAF Gold is best used in sweet breads; for “lean” doughs (low in sugar and fat), SAF generally recommends red-label yeast.
Originally, fresh yeast was the only yeast option, until dried yeast arrived on the market in the 1940s. It comes in a moist, firm block with the consistency of clay. Fresh yeast lends a slightly sweeter, richer flavor to baked goods compared to dry yeast. One downside, though, is its short shelf life: Unlike dry yeast, it’s highly perishable and must be stored in the refrigerator. Even then, it usually only lasts about a week or two — opened or unopened.
Despite these differences, both fresh and dry yeast perform the same function in baking, and fresh yeast will make your bread rise just like dry yeast. For more info on fresh yeast and how to convert between fresh and dry yeast, see our previous post: How do I bake with fresh yeast?
We recommend transferring dry yeast (not fresh) to an airtight container (glass or acrylic) and storing it in the freezer for up to a year. If you buy yeast in bulk (e.g., a 1-pound vacuum-packed brick), open it up; divide it into three or four smaller portions, and store each in a tightly closed container. A zip-top freezer bag works well.
When you’re ready to use yeast, remove the bag or jar from the freezer, spoon out what you need, and quickly return it to the freezer. Yeast manufacturers say you should let frozen yeast rest at room temperature for 30 to 45 minutes before using; frankly, we’re usually too impatient to do that, and have never experienced any problem using yeast straight from the freezer.
By: RedmanShop | January 11, 2025
A little too much flour can be the difference between a dry, cakey cookie and a fudgy, chewy one. And if you’re weighing your flour by volume (i.e., with measuring cups), then it’s very likely you’re adding too much flour.That’s because measuring flour by volume is wildly inconsistent: It all depends on how densely the flour is packed into the cup. If the flour is more condensed, a cup can hold up to 160g of flour. If you fluff and scoop, as we recommend, a cup will hold around 120g.
Don’t have a scale? Buy one now! In the meantime, here’s how to measure flour correctly by volume.But if you weigh your flour with a scale? You’ll always get exactly 120g of flour per cup, precisely as our Test Kitchen (or whoever developed your recipe) intends. Which translates to cookies with the perfect texture, whether that’s chewy chocolate chip cookies or crumbly, buttery shortbread.
Here’s a common ingredient line in cookie recipes: 8 tablespoons (113g) unsalted butter, at room temperature.Don’t ignore those last three words! Butter needs to be the correct temperature to cream with sugar (more on that below), which means it should be right in the Goldilocks zone — not too hot and soft, and not too cold and hard.
But what exactly does room temperature mean? You should be able to press an indent into the butter with one finger, as if you were pressing it into clay. The butter should not be so warm that it’s greasy; it should still be slightly cool, with a bit of resistance when you press it. The best way to get your butter to room temperature is to leave it out on the counter for a few hours. But if you need to get butter to room temperature quickly? We tested tons of different methods to determine the best one.
This is what creamed butter and sugar should look like.
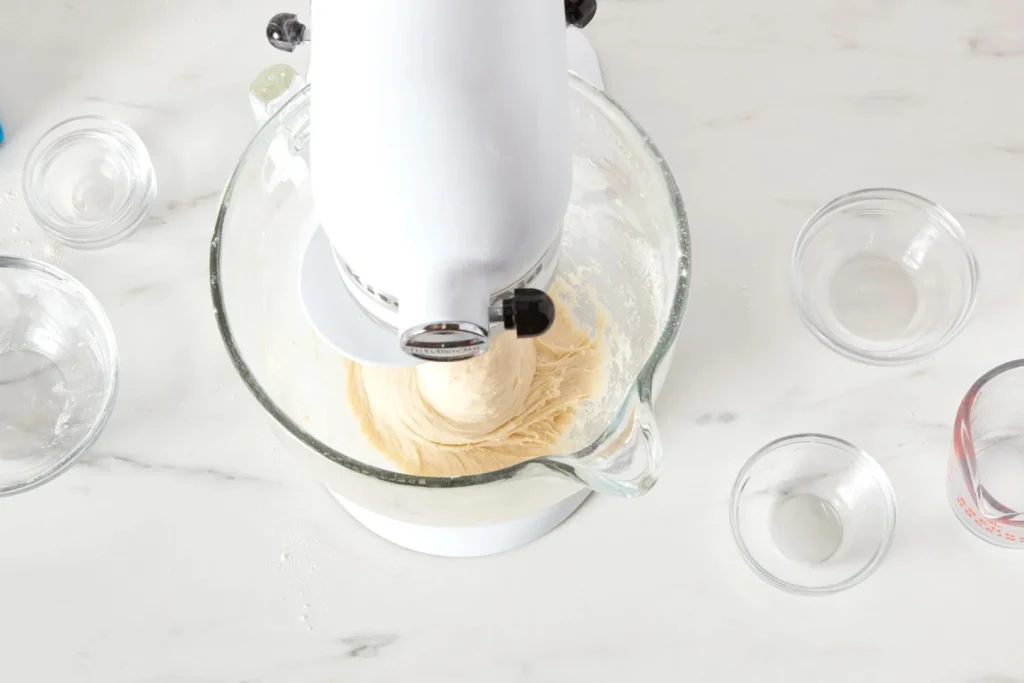
Typically, one of the first steps when making cookie dough is to cream butter and sugar together. This process aerates the mixture — the hard sugar crystals cut through the room-temperature butter, creating tiny pockets of air that help leaven the cookie when it bakes. If you don’t cream butter and sugar long enough, it will still be gritty and dense, which may result in grainy cookies that don’t puff or spread. Meanwhile, if you cream butter and sugar for too long, it will introduce too much air, causing your cookies to potentially puff excessively and become cakey while baking. Properly creaming should take about four minutes on medium speed in a stand mixer, until the mixture is pale and fluffy.
Sugar is sugar, right? Nope! Brown sugar is white granulated sugar with molasses added back in — up to 10% molasses, by weight. This translates to several key differences in your cookie baking. Besides adding caramelized flavor and golden color to cookies, brown sugar is acidic and lowers pH — which is important to activate baking soda, a leavener typically called for in recipes that use brown sugar. (Low pH brown sugar + high pH baking soda = the reaction of leavening.) Using granulated sugar instead would require tinkering with acid levels and leaveners to achieve the same reaction. What’s more, if you use white sugar in place of brown, your cookies may spread less (or more, depending on the other ingredients in the recipe).
Chilling cookie dough can be annoying — do you really want to wait longer for freshly baked cookies? But as tempted as you may be to skip this step, don’t. It’s crucial for many reasons: Chilling cookie dough controls spread, concentrates flavor, and creates cookies with chewy/crisp (rather than soft/doughy) texture. Skipping or shortening that chill may result in thin cookies with less browning and blander flavor. So wait the extra 30 minutes — it’s worth it.
Use a cookie scoop to portion dough with ease (and bake on a nonstick cookie mat to control spreading).
For a uniform appearance and an even, circular shape in all your cookies, use a cookie scoop to portion out the dough. You can choose your preferred size — small, medium, or large — then scoop and drop in half the time it takes to do so with a spoon.
And a bonus tip: If your cookies still turn out a little wonky, you can use a drinking glass to transform them into perfect circles. When the baked cookies are just out of the oven and still hot, take a wide-mouthed drinking glass and turn it over to cover the cookie. Move the glass in a circle, rounding the cookie’s edges as you do so to smooth it into an even shape.
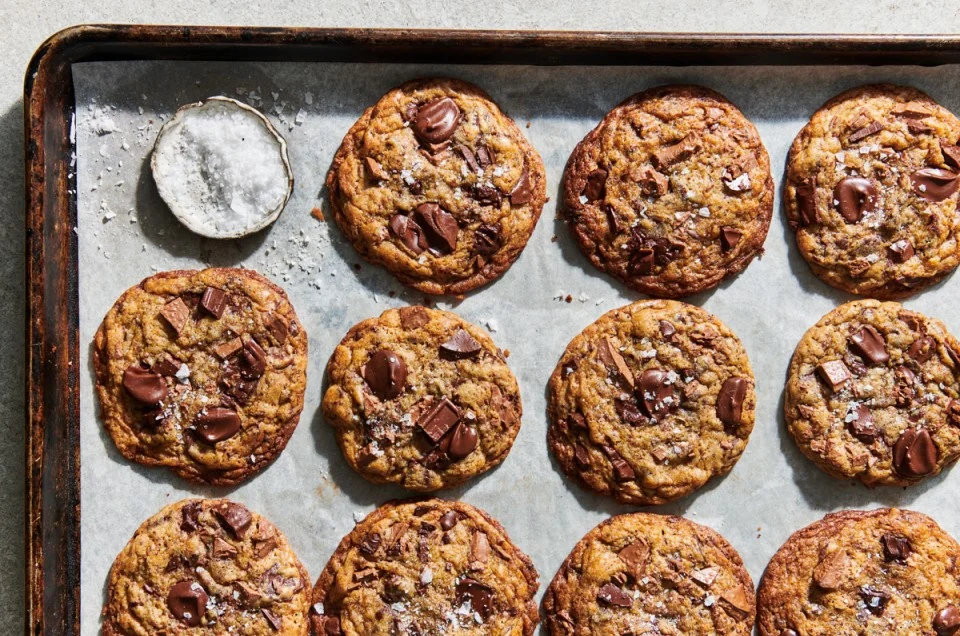
It matters how you line your pan, and we’ve done the baking to prove it. In an experiment testing five different pan lining methods against each other, cookbook author Jesse Szewczyk found that cookie spread varied wildly depending on how the pan was lined. A greased baking sheet caused unsightly dark bottoms and burned edges, while an ungreased, unlined baking sheet put cookies at the risk of sticking. Baking on aluminum foil caused the cookies to spread extensively and become thin and crispy.
When lining your pan to bake cookies, we recommend two methods. A good, safe bet is to use parchment paper. The cookies spread just enough while maintaining a nicely domed center. For even more consistent results, baking on a nonstick mat resulted in perfectly shaped cookies that spread just the right amount.
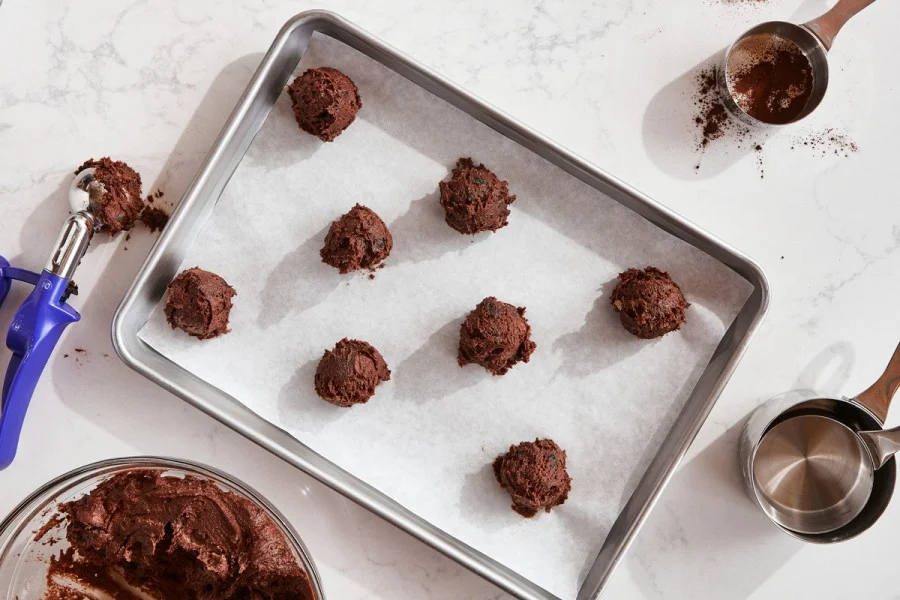
Leave at least several inches between scoops of cookie dough.
Cookies tend to spread more than you think they will. So as much as you may want to knock out an entire batch of dough at once, resist the urge to crowd them on the baking sheet. Instead, leave several inches in between each ball of dough. Otherwise, the cookies can spread and run into each other, transforming them into messy shapes and ruining the contrast between crispy edges and chewy centers.
And for extra insurance, follow the next tip, then space cookies based on what you learn there …
Before placing all your dough in the oven and hoping for the best, bake one or two test cookies before scooping and baking the entire batch. That way you can do a complete initial assessment of:
Adjust accordingly before baking the full batch to guarantee your best bake.
For a soft — not snappy — interior, make sure you pull your cookies from the oven at the correct time.
It’s always best to err on the side of underbaking a cookie, instead of overbaking. Typically, cookies should still look a little underdone when you pull them from the oven — that’s because they’ll continue to bake on the hot baking sheet, and they’ll settle and firm up as they cool. You want to remove your cookies from the oven once they’re just set in the middle, with golden brown edges. If you’re unsure what “set” looks like, keep an eye on their shine. If the dough is shiny as it bakes (thanks to the butter or other fat in it), that shine will significantly reduce or go away once the cookies are set. As soon as they reach that stage, remove them from the oven. Even if they don’t feel firm yet, they’ll continue to set and harden as they cool.
Ready to bake your best cookies yet? Find your next recipe with our collection of Classic Cookies.

By: RedmanShop | January 11, 2025
After all the work it takes to make bread, not to mention time (sometimes multiple days!), the last thing you want to do is stumble at the final hurdle. But that’s exactly what can happen if you underbake your bread — resulting in a gummy, dense crumb — or overbake it, causing it to harden and dry out.
You can. Many of our recipes call for loaves to be baked to a specific internal temperature, as measured on an instant-read thermometer. (For specifics, check out this blog post: Using a thermometer with yeast bread.) But as a seasoned bread baker, Barb recommends methods that pros, home bakers, and grandmas alike have been using for centuries.
“I learned to bake bread at an artisan bakery, and we never took the temperature of our breads,” Barb says. “Professional bakers simply don’t tend to use this method. Instead, I encourage bakers to learn to use their senses to guide them: the aroma, color, feel, and sound of the loaf can provide all the confirmation you need that your bread is fully baked.”
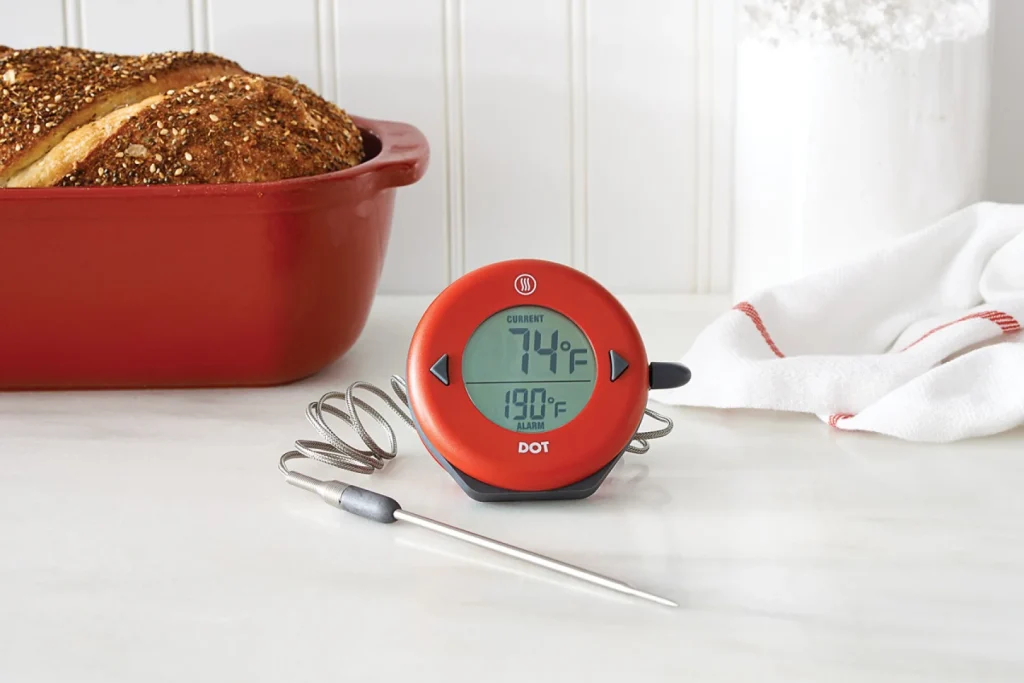
Use your senses to gauge doneness (more on that below!), and then turn to a thermometer as a way to confirm your instincts and ensure the bread is fully baked. It’s a secondary tool, rather than the only one. This is especially important because the center of a loaf can reach its “finished” baking temperature several minutes before the end of baking time, so only using temperature can sometimes be misleading.
“Just like other baked goods, when the delectable aroma of homemade bread starts wafting through your kitchen, that’s a good sign that your bread is close to being done,” advises Barb. Don’t stray too far from your oven at this point!
“For crusty artisan bread, one way to determine doneness is by thumping the bottom of the loaf,” says Barb. “Give it a few quick knocks on the bottom of the loaf with your knuckles; if it sounds hollow, that tells you it’s fully baked.”
No matter what type of bread you’re baking, the finished loaf should feel noticeably lighter in weight than the dough did. “Bread loses quite a bit of water weight as it bakes,” Barb explains. “Moisture loss can vary from one type of bread to the next, but expect at least 15% weight reduction for most breads.”
If you ever take an artisan bread class at Baking School, you’ll learn that when crusty loaves of bread (think baguettes or boules) are pulled out of the oven, they should have extremely firm crusts that only yield when squeezed very hard.
Crust color is a clear visual indicator of bread doneness, but Barb says different types of bread have varying levels of color to look for.
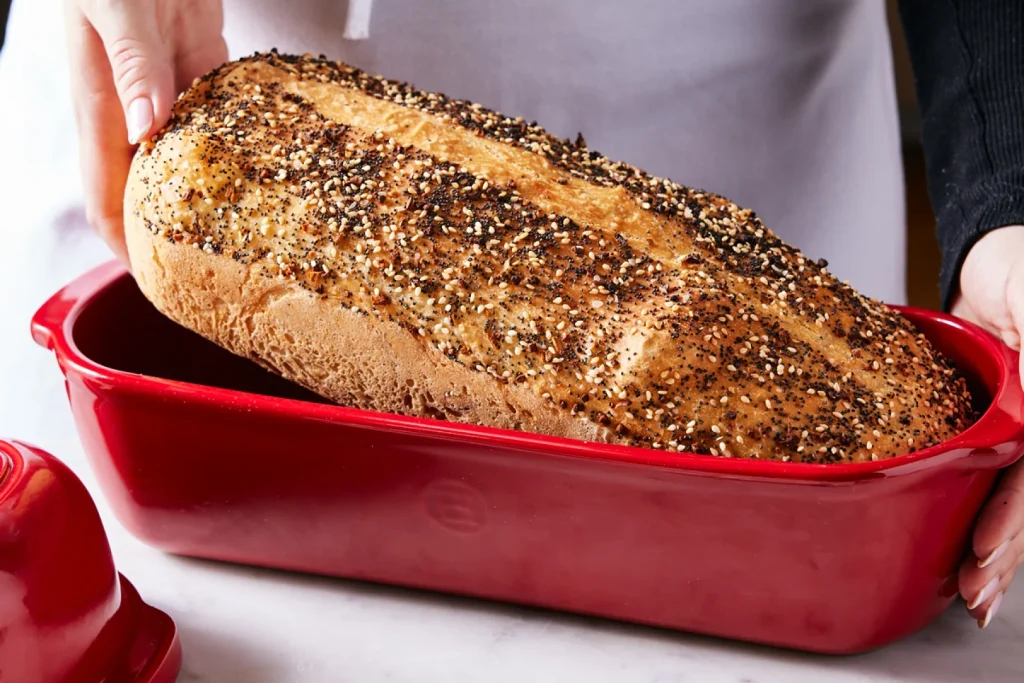
Sandwich bread and pan loaves: “The color should be a rich golden brown and the top crust should feel firm. Don’t be afraid to tilt the loaf out of the pan to be sure the sides and bottom are also nicely golden brown and sturdy.”
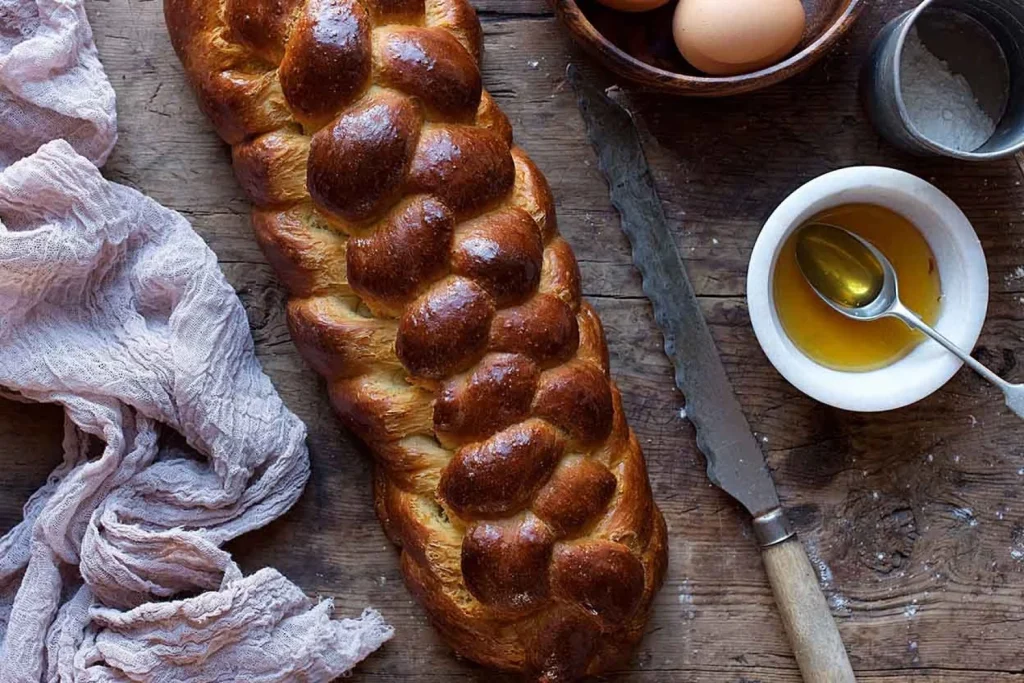
Challah or other free-form enriched loaves : “Look for the lightest part of the loaf (between the braids or an area that isn’t egg-washed) to have taken on some color. It won’t be as dark as the egg-washed surface, but it shouldn’t look too pale or doughy either. Look for a lighter golden brown in these areas. Check the bottom of the loaf for color and firmness as well.”
Brioche : “This one can be tricky because you really need to bake to a rich brown color for the interior to be fully baked, since the butter and sugar causes brioche to brown more quickly. Take your bread out when the crust is a deep mahogany and don’t be afraid! Color means flavor.”
Crusty artisan loaves and sourdough : “Dark color translates to more flavor, so I go a bit darker with these types of breads. Our Baking Ambassador Martin Philip shares helpful intel in a great article on this subject,” Barb recommends. One takeaway: Look for a little strip of char on the loaf’s ear, like it’s wearing eyeliner.
It’s important to remove your bread from the oven at the correct time, and it’s handy to have your thermometer to check the internal temperature, but that’s not all it takes to nail the perfect bake.
“Remember that bread isn’t fully done when it comes out of the oven,” advises Barb. “Moisture continues to be released as bread cools, and the internal structure of the loaf needs that time to set completely. Unless you want to end up with a gummy interior, let your bread cool completely before slicing into it.” (Moist, dense rye breads with a high percentage of rye flour often benefit from up to 24 hours of cooling time!)
In the end, the best way to develop your baking sixth sense is to keep practicing, paying attention to these cues each time. “I know trusting your senses can seem difficult at first,” says Barb, “but this is one of those baking skills that will improve with every loaf you bake!”
By: RedmanShop | January 10, 2025
Starting your journey as a bread baker? It can be daunting — so many confusing terms! — but once you understand what everything means, the process becomes much clearer. Here, we’re diving into one of the most crucial steps to making homemade bread: proofing.
Everyone knows that bread dough rises, right? Well, that’s basically what proofing means! It’s when bread dough is left to ferment — the yeast (commercial yeast or sourdough culture) consumes the sugars and starches in the dough and expels carbon dioxide — which causes the dough to expand as it traps the carbon dioxide within its strong and stretchy gluten network. As bread proofs, it typically doubles (or nearly doubles) in size, becoming puffy and pillowy.
Professional bakers often use terms that are different from the ones used by home bakers. In this case, there are several different terms that are used interchangeably to describe this step. Other words and terms that refer to proofing include rise and fermentation.
Which leads to the next point: Bread dough is usually left to rise two different times in the baking process, and proofing technically refers to just the second of these rises but is often used to describe both.
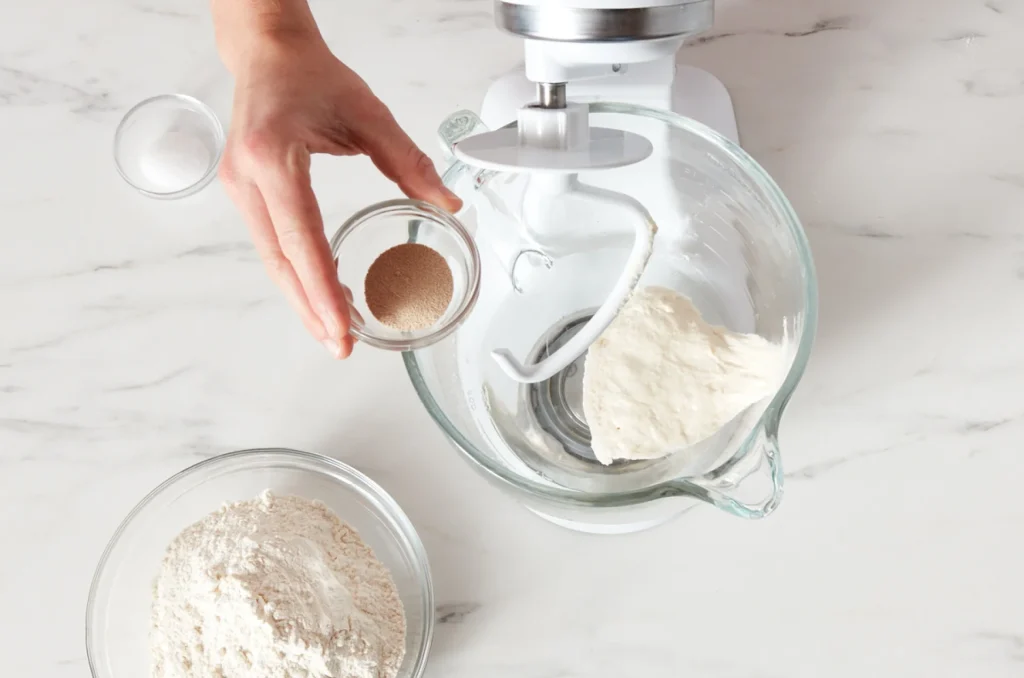
In a standard bread recipe — take Classic Sandwich Bread for instance — the bread dough is mixed and kneaded, then left in a covered bowl to rise (usually, but not always, doubling in size). This step is often called first rise, first proof, bulk fermentation, or bulk proof. It typically takes around 1 to 2 hours, depending on the dough and the environment in which it’s left to rise.
Once the dough has undergone bulk fermentation, it is shaped. In this example, it’s shaped into a sandwich loaf and placed in a bread pan, but this also applies if you’re shaping a boule, a bâtard, or even rolls. Once shaped, the dough is left to proof a second time — this is the step that “proofing” technically refers to. Much of the air was knocked out of the dough while shaping, so this is a chance for the dough to expand again before baking. This step is sometimes called second rise or second proof.
One of the biggest keys to successfully proofing bread dough is temperature. Yeast thrives best in a warm environment, and the warmer the conditions, the quicker your dough will proof. “Breads do well in the low to mid-70s, between 72°F to 78°F,” says Baking Ambassador Martin Philip. “That’s just the right range to encourage yeast activity without having your dough move so fast that it overproofs or fails to develop flavor.”
Martin prefers an electric folding bread proofer, which allows him to control the temperature and environment in which his bread proofs. But you can also be intentional about where in your kitchen or home you place your bread to proof to ensure you have the best environment — and temperature — for yeast to thrive.
Ideally, you want to find the warmest spot in your house, where cozy temperatures will encourage yeast activity. Options include:
If you’re baking bread in the summer or your house is naturally warm, you may not need to go with any of these options — your kitchen counter may be warm enough. A digital thermometer is a helpful way to gauge the temperature of your bread throughout proofing: If it stays around 72°F, it’s fine where it is. If it drops in temperature, consider moving to a warmer spot.
While many cookbooks recommend using a tea towel to cover rising dough, we don’t agree. “Draping your dough with a kitchen towel is not a sufficient cover — your dough will dry out, forming a skin,” says Martin. “Use an airtight lid, bowl cover, or plastic wrap instead.” If you’re doing a lot of bread baking, consider a lidded dough-rising bucket.
A dough-rising bucket provides an airtight cover and markings to gauge when your dough actually doubles in size.
It depends! (Not a very satisfying answer, we know.) Recipes typically include time ranges (“Let rise for 1 to 1 1/2 hours”), but these should be considered guidelines, not hard and fast rules. Instead, use visual clues to determine if your dough is well-proofed — more on that next.
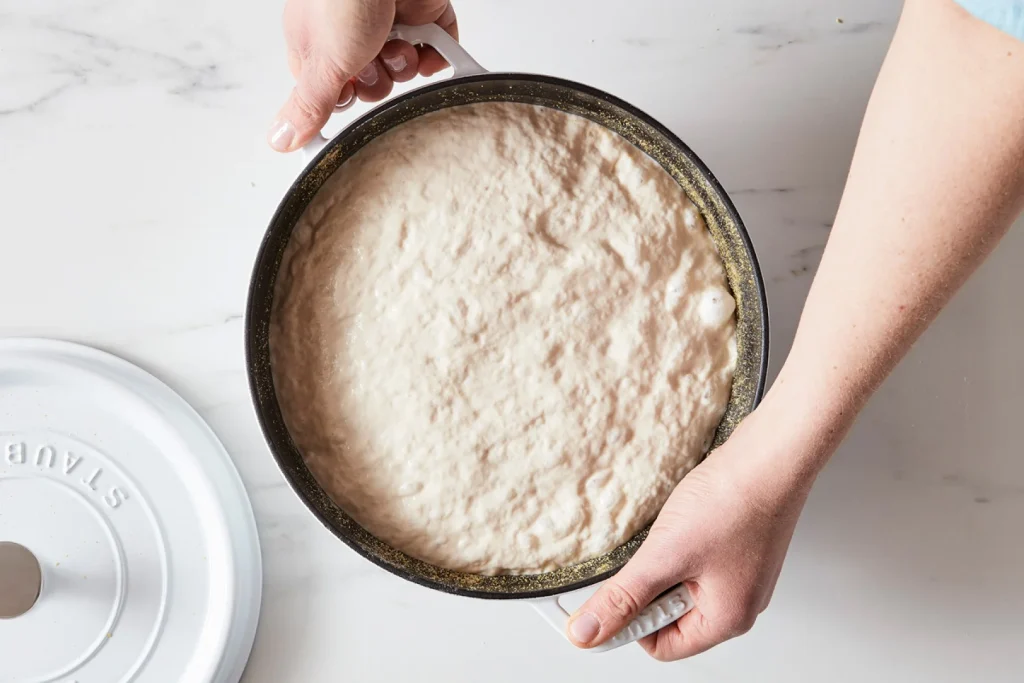
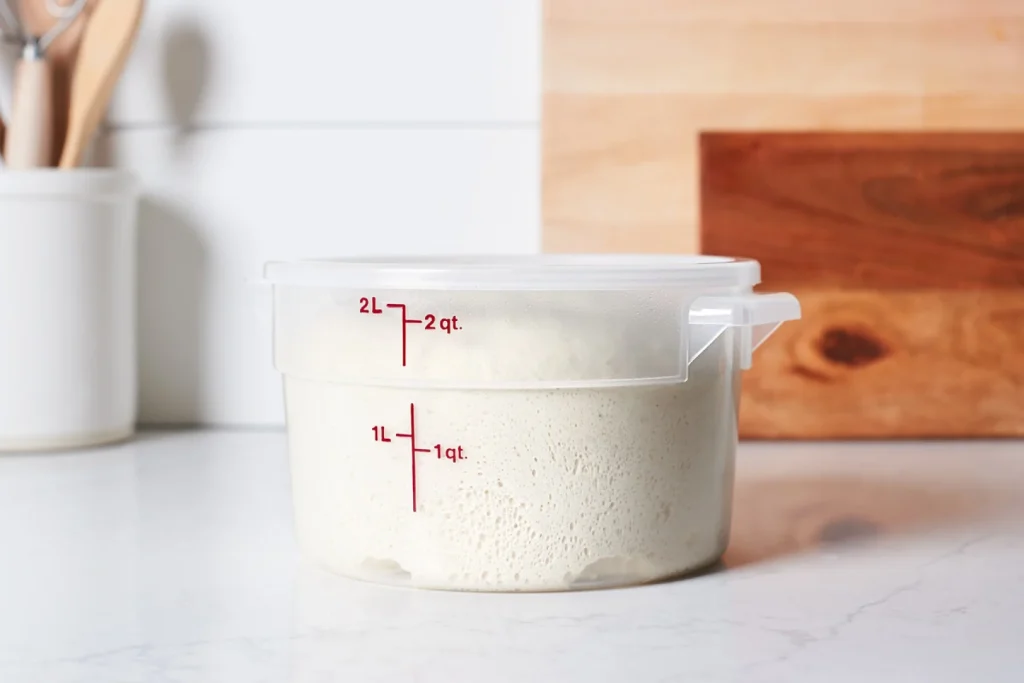
If the dough is supposed to double in size during bulk fermentation, place it in a straight-sided container with markings on the side so you can easily and accurately tell when it has doubled in volume.
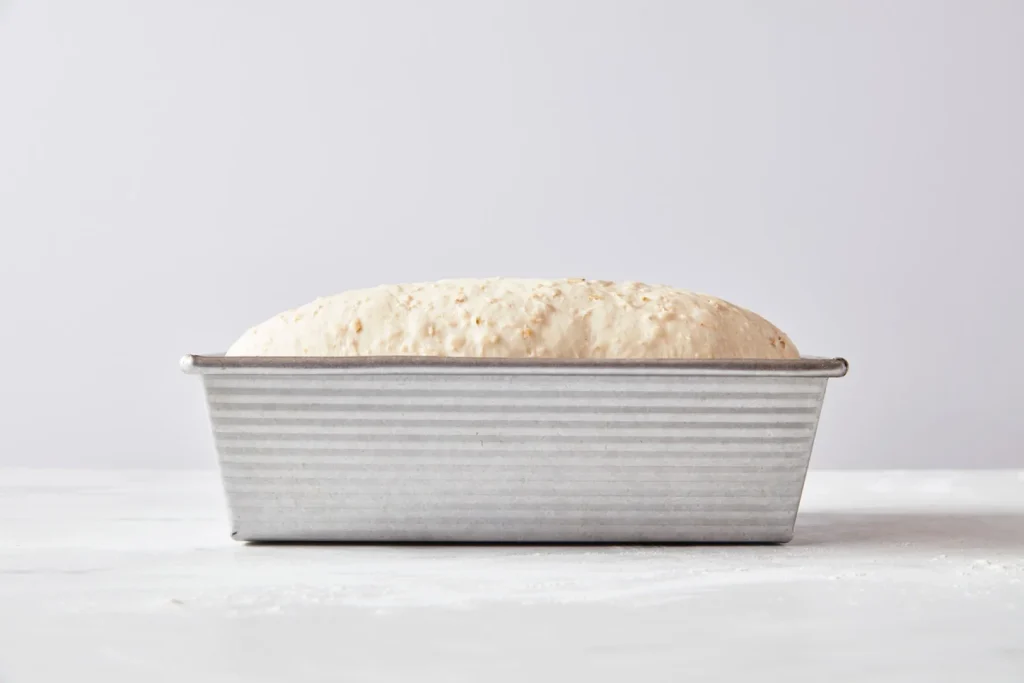
If you’re proofing shaped sandwich bread dough in a loaf pan, look for the dough to rise 1″ over the lip of the pan. (Don’t guess, use a ruler to measure!)
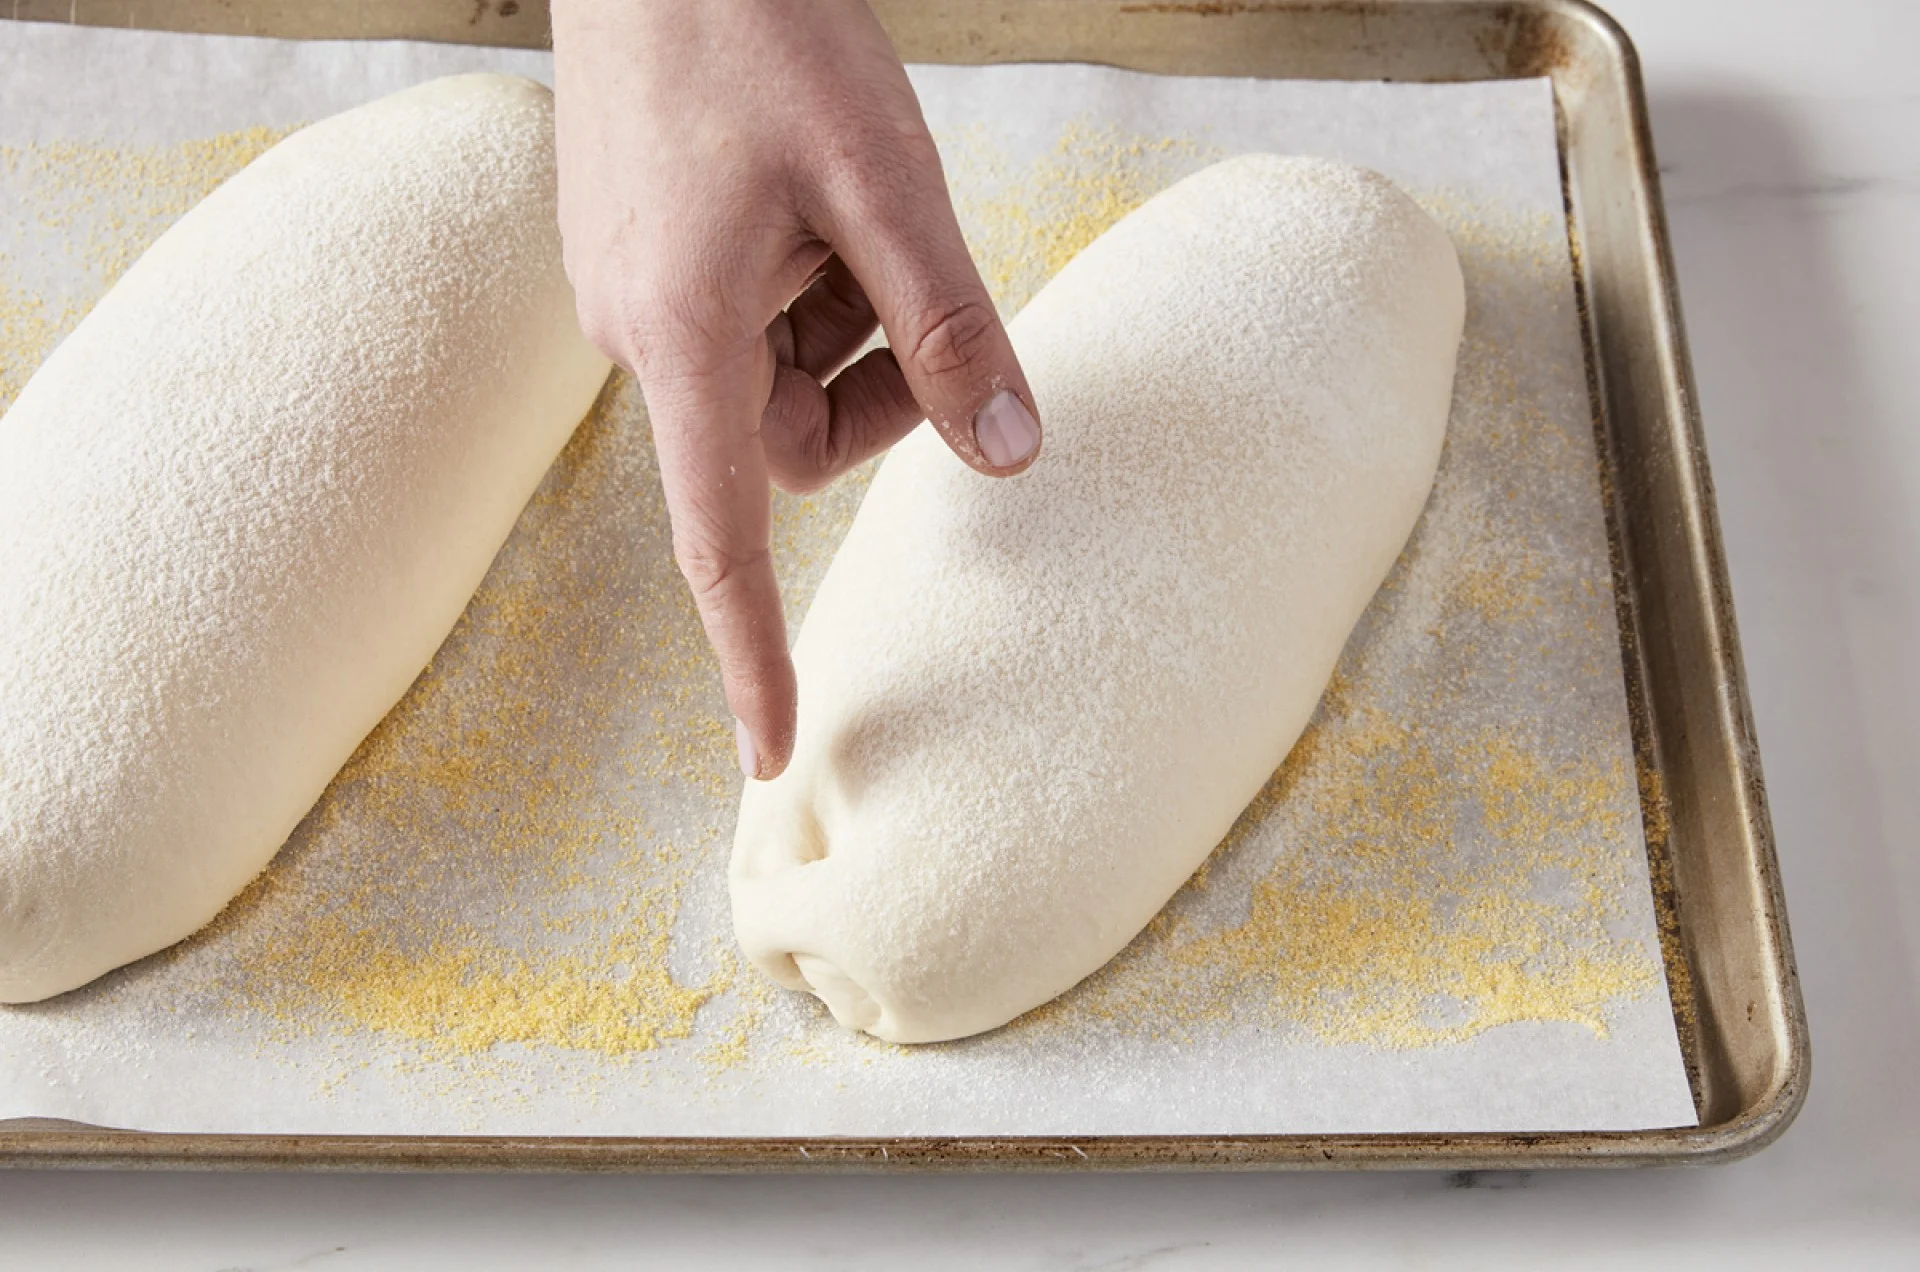
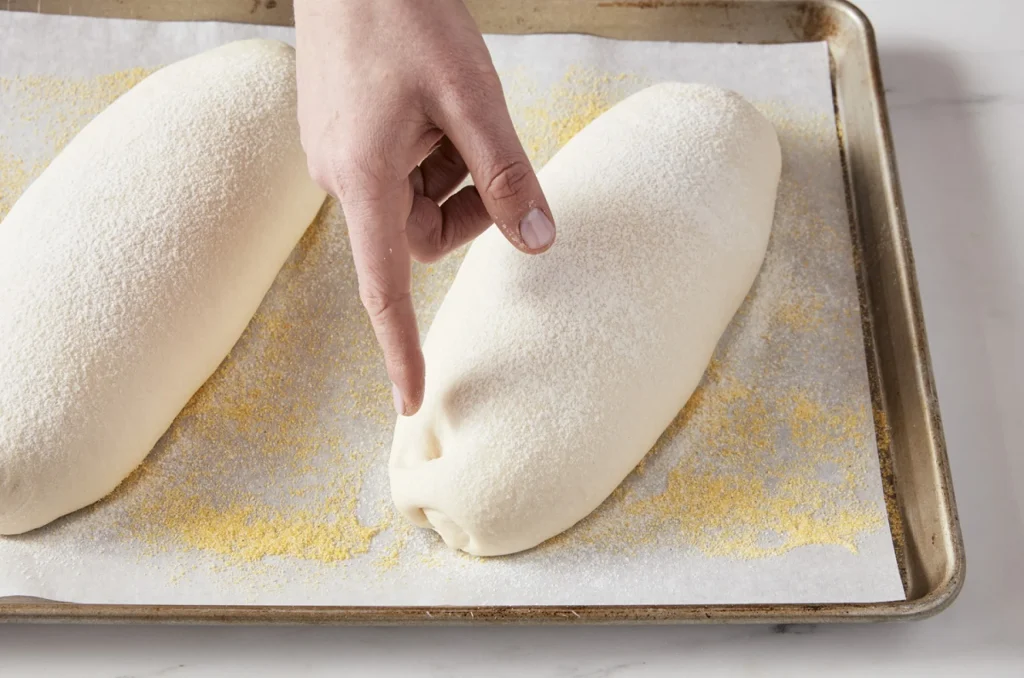
For freeform loaves, use the poke test to determine proofing: Lightly flour your finger and poke the dough down about 1″. If the indent stays, it’s ready to bake. If it pops back out, give it a bit more time. See more guidelines here: How do I know if my bread dough has risen enough?
And remember: As a general rule, if your dough is proofing in a cool environment, it will take longer. If it’s proofing in a warm environment, it will be quicker.
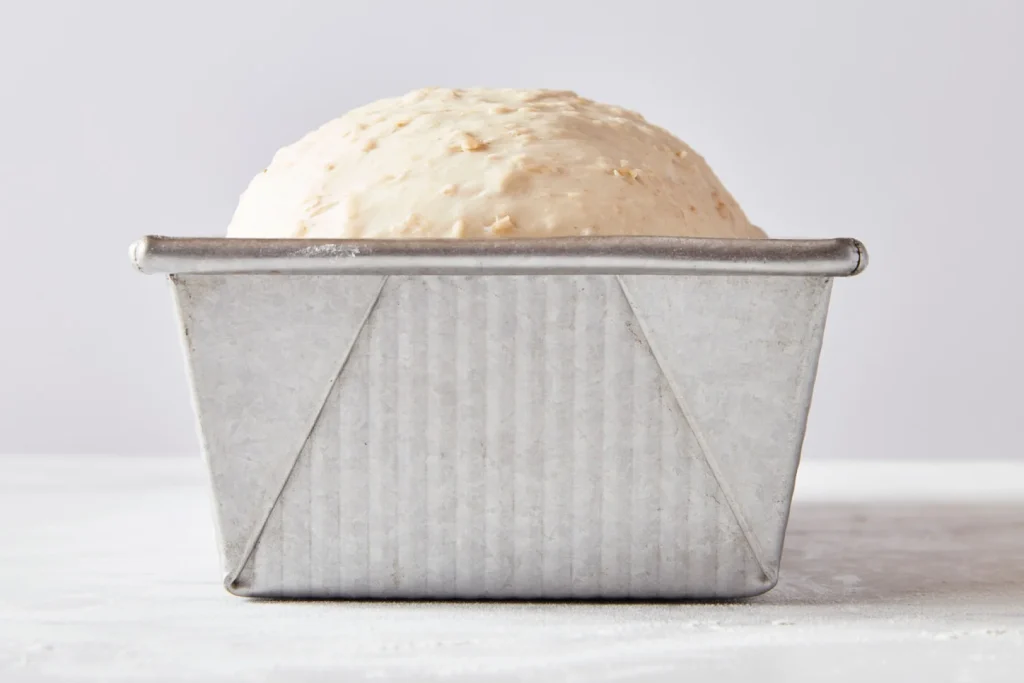
When sandwich bread dough rises 1″ over the rim of the pan, it’s time to bake!
“Proofing is every bit as important as the other foundational aspects of bread making, from mixing to baking,” says Martin. “It’s key to bread’s structure, oven spring, and the beauty of the final loaf.”
While proofing may be the most passive step in bread baking — you literally sit back and wait — it’s also one of the most crucial. Being mindful of how you cover your dough, where you place it, and when you bake it will set you up for baking success and better bread.
By: RedmanShop | January 10, 2025
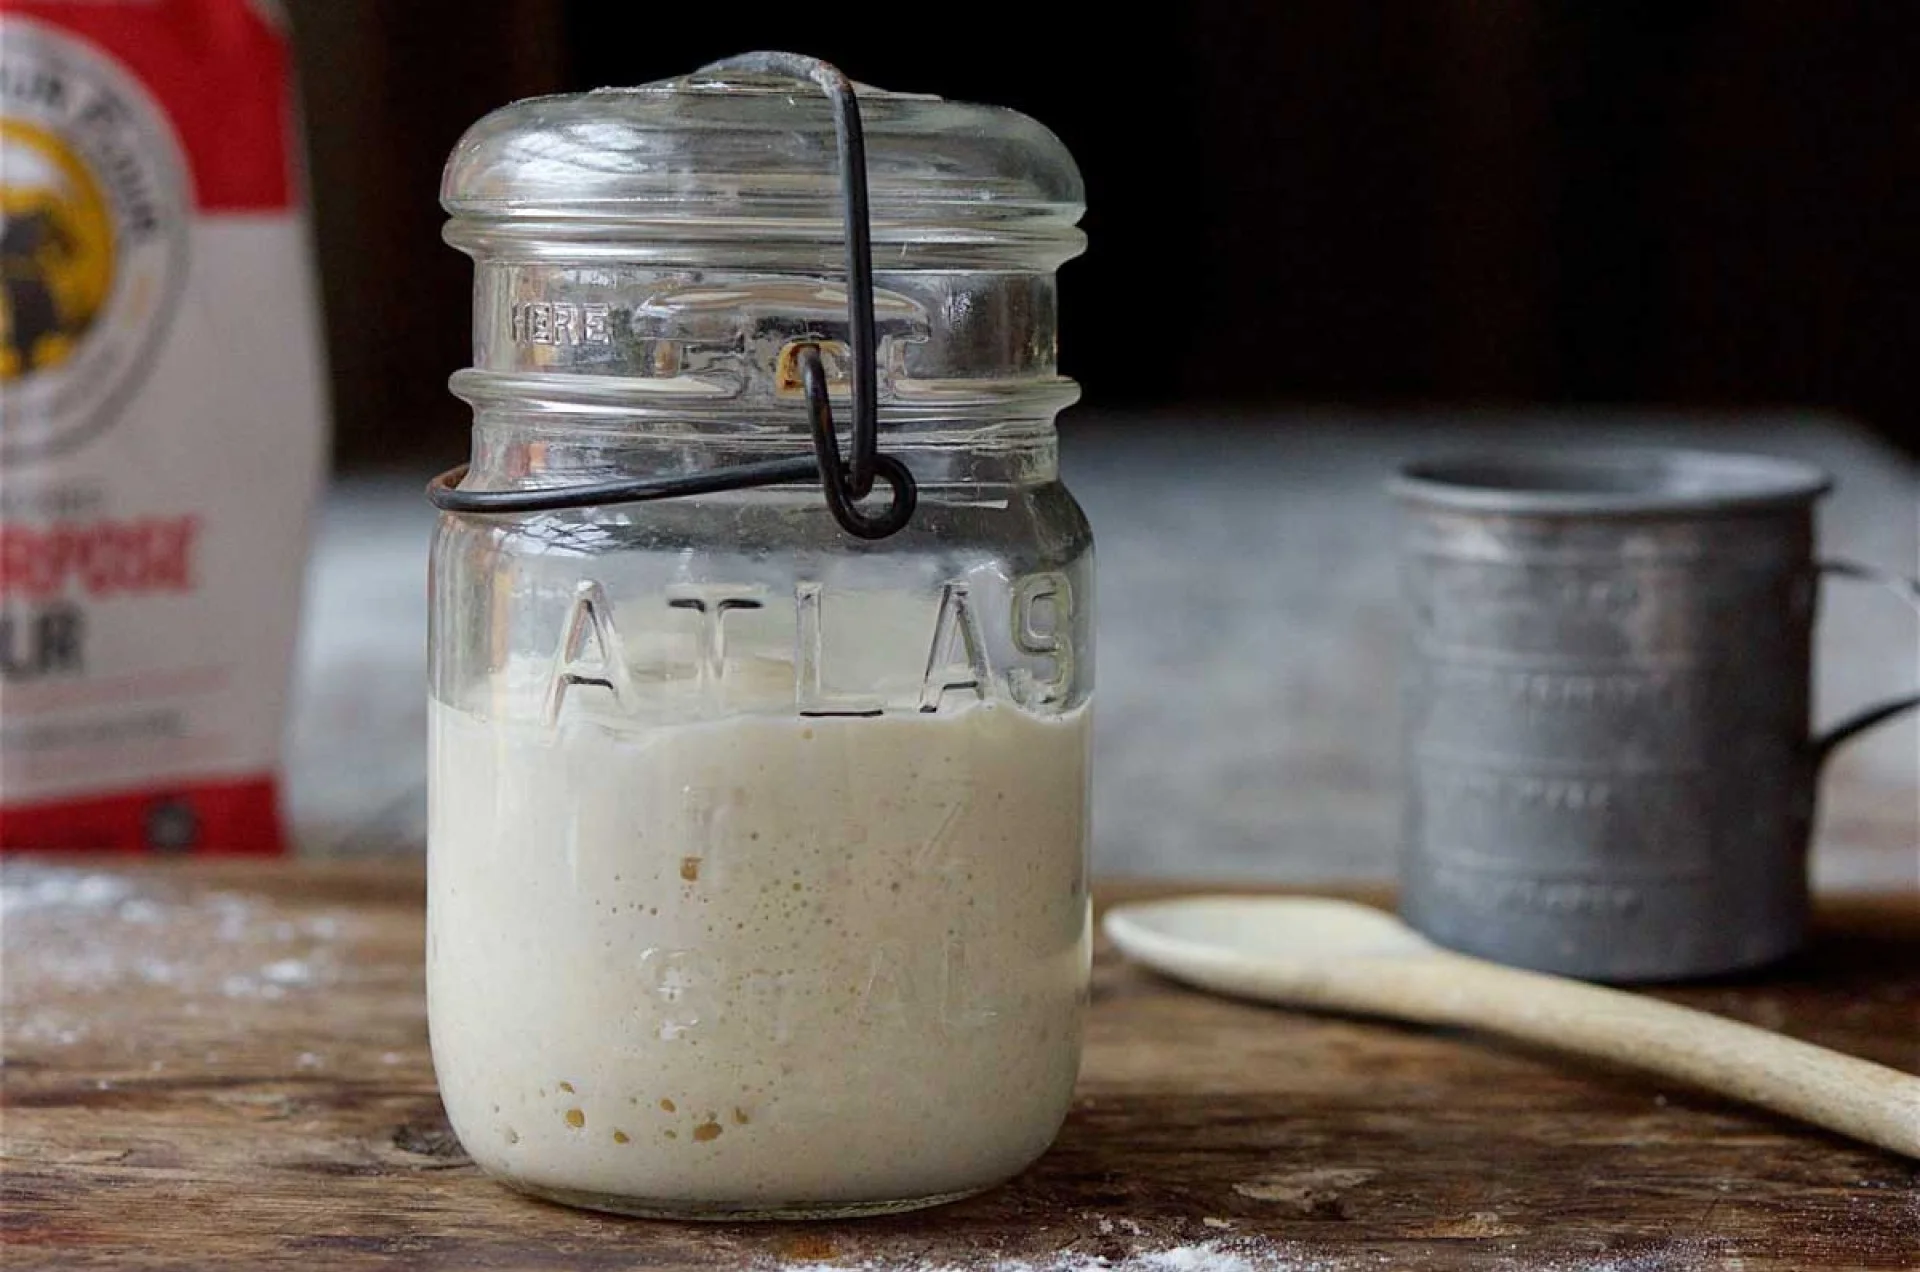
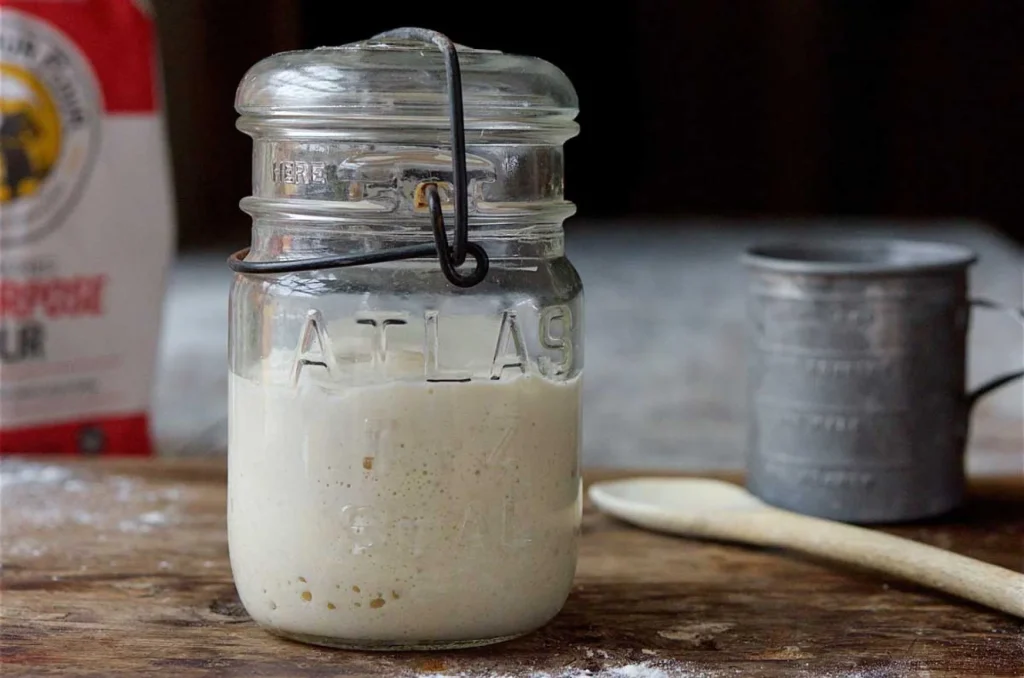
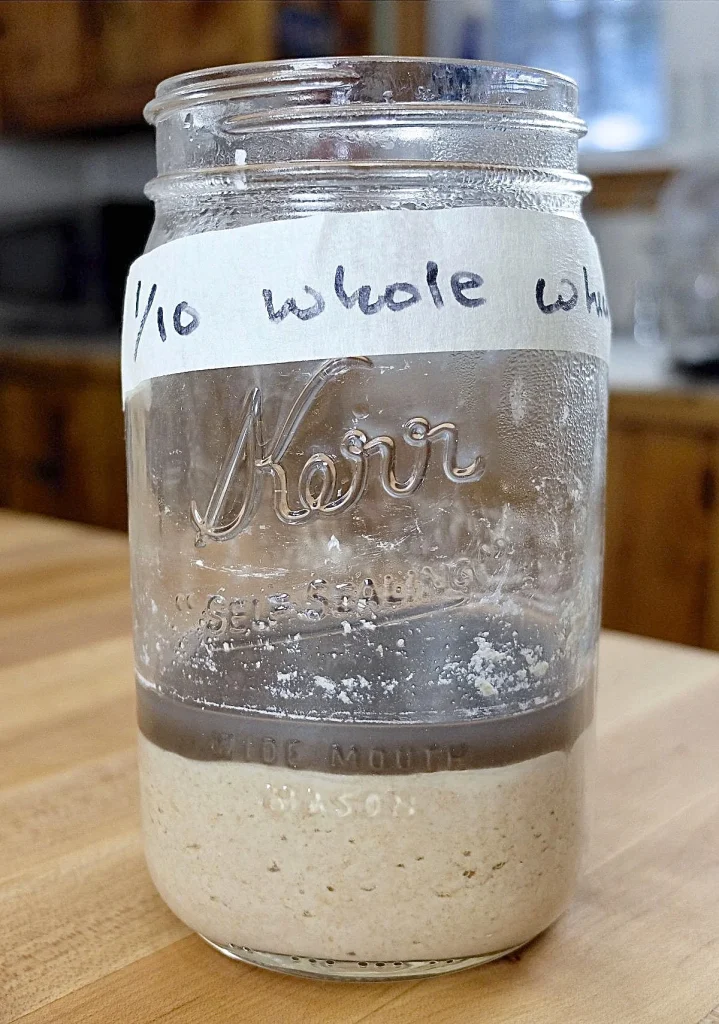
“Did I kill my starter?” This is a surprisingly common sourdough question on our we receive. Novice and experienced bakers alike worry about the viability of their starters and call us for sourdough starter troubleshooting advice.
For many sourdough bakers, the underlying biochemistry at work in their starter remains a bit of a mystery. Thankfully, it’s quite possible to bake great sourdough bread while still being a little fuzzy when it comes to what’s actually happening in that little jar of starter.
The 6 to 10 days it takes to create a healthy and mature sourdough starter from scratch requires slightly more attention to “death threats,” because a fledgling starter hasn’t yet developed the defenses that characterize a mature starter. But once your starter is fully developed, it’s really pretty darn hard to kill.
And if you’ve purchased a sourdough starter from us, rest assured that it’s a mature specimen that will stand up well against unwanted bacteria or mold.
METAL: Stirring your starter with a metal spoon or placing it in a metal bowl won’t kill your starter. While we don’t recommend making or keeping your starter in contact with reactive metals like copper or aluminum, stainless steel is harmless.
MILD NEGLECT: Missing a feeding or not timing the feedings exactly 12 hours apart won’t even come close to killing your starter. Please don’t ever set your alarm to get up in the middle of the night to feed your starter!
INCORRECT FEEDINGS: Feeding your starter the wrong amount of flour or water won’t kill it. While your starter may seem too dry or too wet, and may not rise the way you expect, no permanent damage has been done. You can correct its consistency by adding a little more flour or water, and then being more careful the next time you feed it.
BRIEFLY FREEZING YOUR STARTER: While there’s some dispute among sourdough enthusiasts about the benefits and/or dangers of freezing sourdough starter, a brief period in the freezer isn’t likely to kill a fully developed starter.
I recently froze a portion of my well-maintained starter a few hours after it was fed. Three days later I thawed it out at room temperature and let it continue to ferment. It was definitely sluggish at first, but after a second feeding it rose well and had a good aroma.
That being said, too much time in the freezer will definitely damage some of the wild yeast in your starter, and is also likely to kill off some of the friendly bacteria that contribute flavor. If you need to put your starter on hold for an extended time, we recommend drying your starter.
HEAT: If you allow your sourdough starter to ferment in the oven with the light on to keep it warm, and then forget it’s in there and turn on the oven, it’s unlikely your starter will make it out alive. Yeast dies at 140°F, and it’s likely that your sourdough starter will suffer at temperatures even lower than that. It’s best to maintain your starter at comfortable room temperature (around 70°F), though a little higher or lower won’t hurt anything.
SEVERE NEGLECT: If you neglect your starter long enough, it will develop mold or signs of being overtaken by bad bacteria. Mold can appear in various colors and is typically fuzzy in appearance. Bad bacteria is generally indicated by an orange or pink tinge or streak. Once your starter has lost its natural ability to ward off intruders, it’s time to start over.
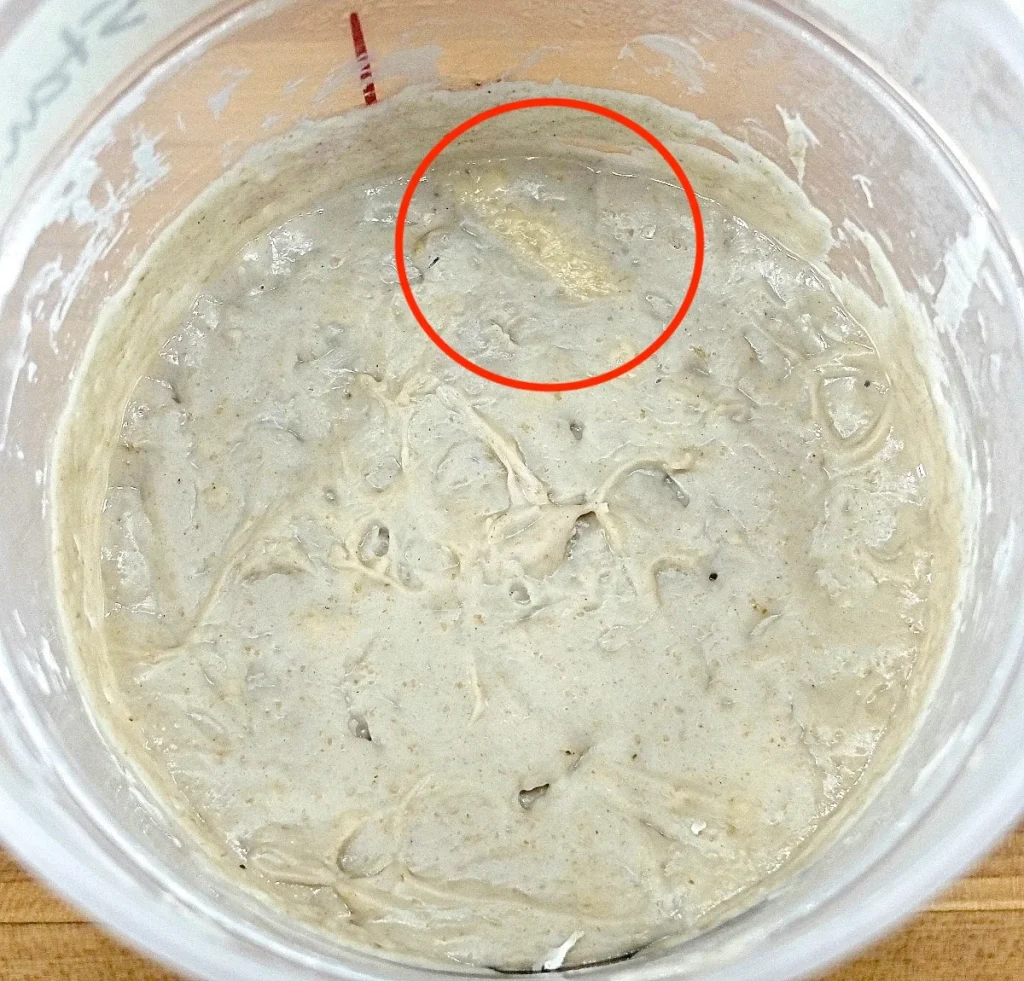
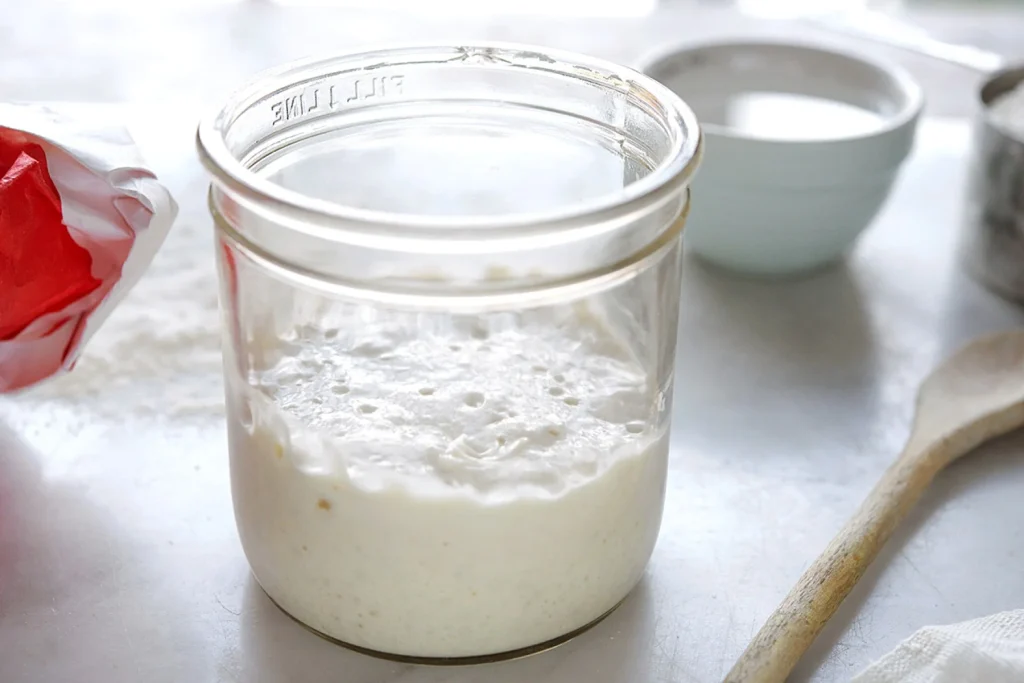
“Hooch” is the liquid that collects on the top of your starter when it hasn’t been fed in awhile. This liquid is the alcohol given off as wild yeast ferments. The presence of hooch isn’t a sign that your starter is in danger. However, it does indicate that your starter is hungry and needs to be fed.
When your starter is neglected for an extended period, the hooch tends to turn from clear to dark-colored. We get lots of calls from sourdough bakers worried about the safety or danger of various hooch hues. Is gray bad? What about brown or black? Surprisingly, none of these colors indicate that your starter has spoiled.
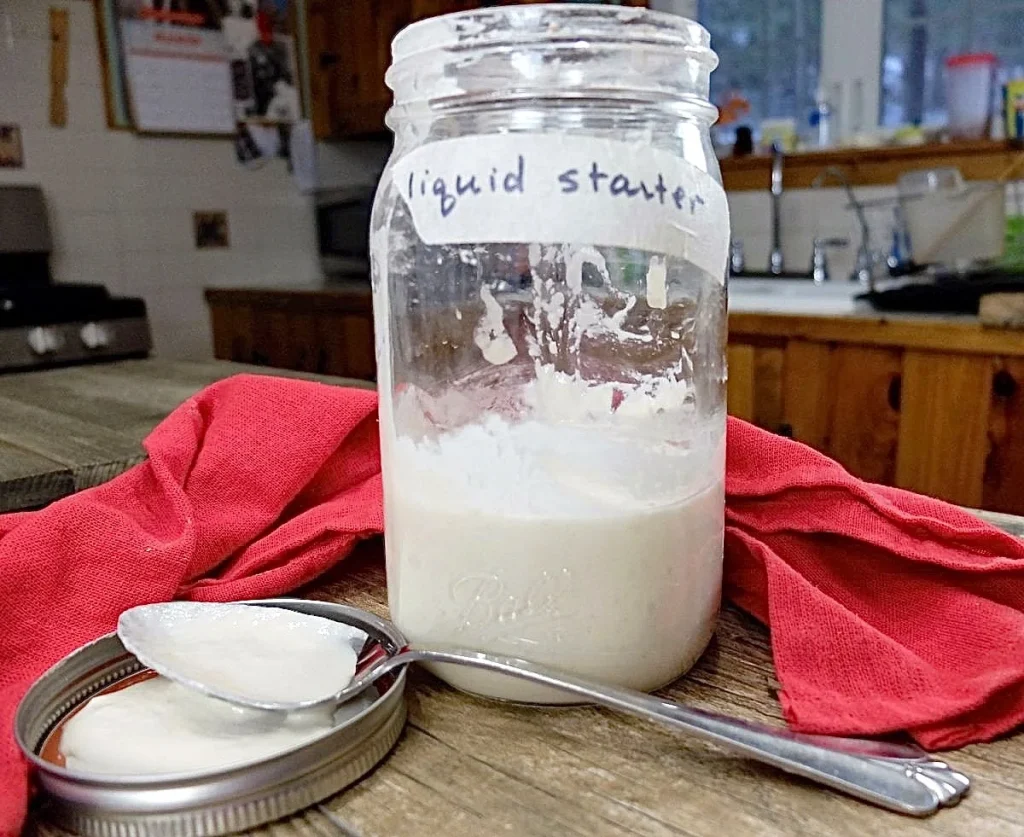
See the orange streak? This starter shouldn’t be saved.
However, if you see a pink or orange tint or streak, this is a sure sign that your sourdough starter has gone bad and should be discarded. The stiff starter above was left out at room temperature for two weeks. It’s definitely time to throw it out and start over.
I hope you’ll share your own sourdough starter questions and discoveries below. There’s always more to learn when it comes to sourdough!
By: | January 9, 2025
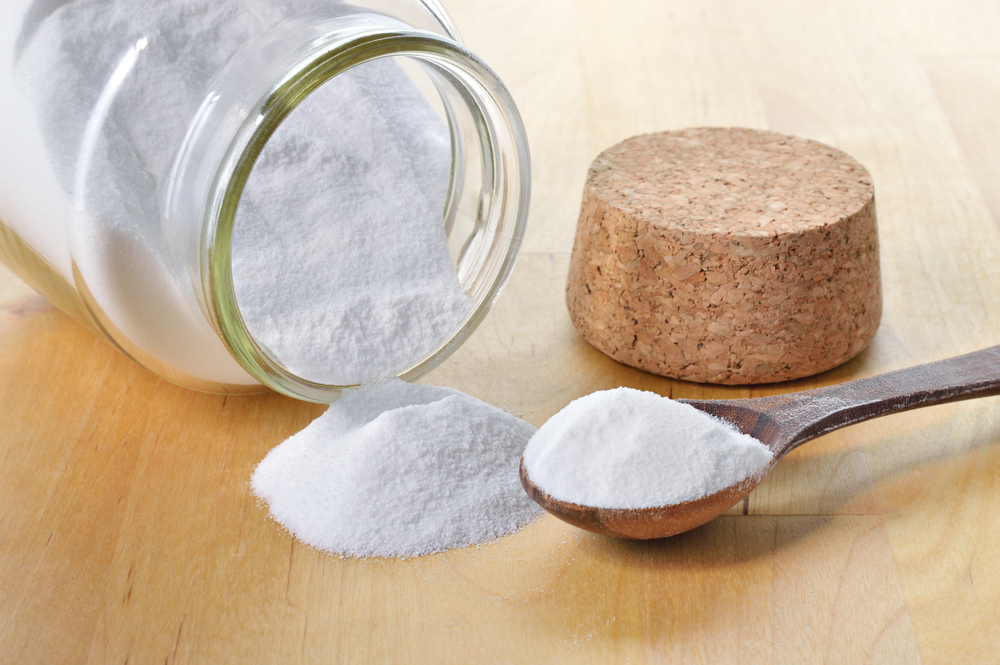
Baking soda can serve many purposes. With its slightly bitter and salty taste, it works in conjunction with baking powder to act as a leavening agent in many baked goods. Due to its unique and highly alkaline composition, baking soda can also be used for cleaning, deodorizing, beauty products, insect bite relief, natural mouthwash, weed killer and much more.
We have all encountered baking soda at some point in our lives. The multipurpose and multifunctional, naturally occurring chemical seems to be everywhere. In our pantries, cleaning products, refrigerators, and, of course, recipes. Though baking soda is widely known and utilized, many are still unfamiliar with the core of what it does or to the extent; it is necessary in recipes. Commonly used as a leavening agent in baked goods, baking soda is often confused with its counterpart leavening agent, baking powder.
What’s the difference between baking soda vs baking powder? To understand how baking soda works and why it is unique, we must understand what baking soda really is.
Baking soda, also known as sodium bicarbonate, is a naturally occurring crystalline chemical compound but is often found in powder form. Although baking soda is naturally occurring, it is often mined and, through a chemical process, created. Most baking sodas found commercially in the United States come from ore mined in Wyoming. The ore is heated until it turns to soda ash, and then it is combined with carbon dioxide to create the chemical baking soda. That being said, naturally occurring baking soda is also still available and is mined in the form of nahcolite. Nahcolite is the form of sodium bicarbonate that is most natural and has no chemical additives. Bob’s Red Mill is proud to sell natural baking soda that has not been chemically produced.
Baking soda is highly versatile and when used by itself or combined with additional compounds, can lend itself as a remedy for multiple different uses. Valued for its cleaning and baking properties, baking soda has been used for thousands of years. Use of baking soda dates back to Ancient Egypt when it was used as a cleaning and drying agent in the process of mummification. Baking soda became commercially available during the mid-19th century and has since become a staple in most homes, whether it’s in cleaning products, beauty products, or even in a wide range of cooking and baking recipes.
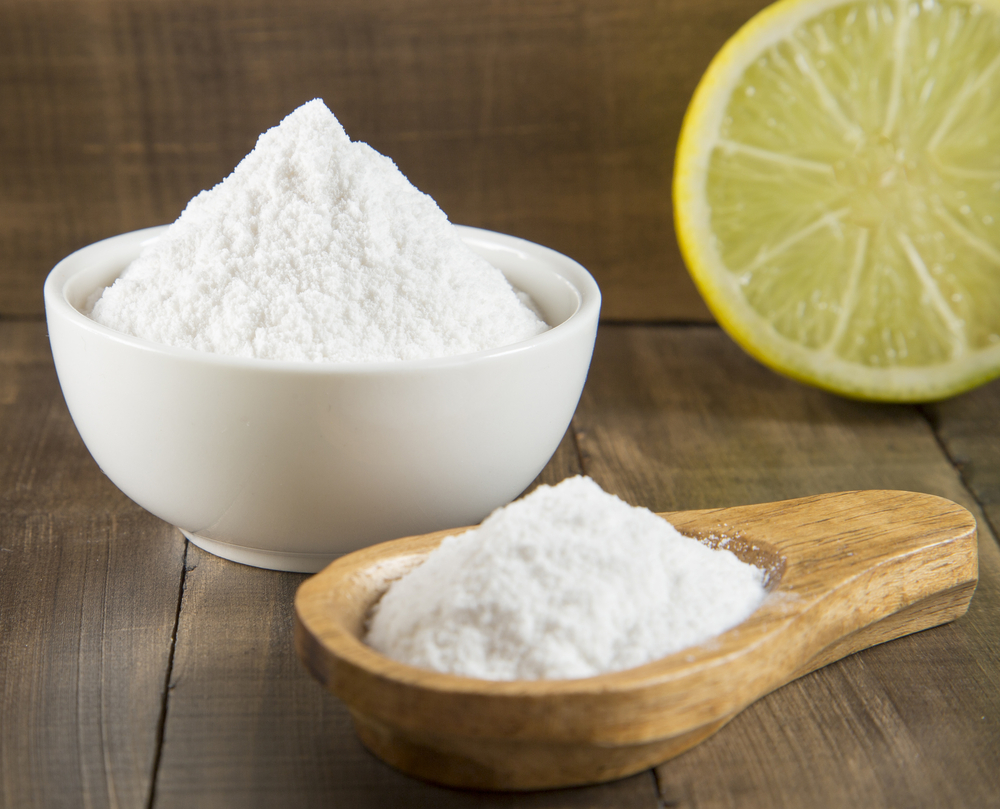
Baking soda is most commonly used in baking as a leavening agent, hence its name. Before the commercialization of baking soda, biological leavening and fermentation processes were used but less convenient due to the extensive length of time associated with biological leavening. As most have formerly learned through science class and experimental measures, when a base meets an acidic ingredient like buttermilk, sour cream or lemon juice, a chemical reaction occurs. This concept is the same for baking soda as it pertains to baking. When baking soda is mixed with an acid and a liquid, it will create bubbles of carbon dioxide gas that give it a fluffy texture. That being said, baking soda can react without acid if it is warmed above 122°F or subject to long-term heat and humidity. If baking soda is stored within reasonable temperatures (at or below 77°F and 75% humidity), it will keep indefinitely.
Baking soda is generally used as an active ingredient in quick-bake recipes such as cookies, muffins, and pancakes. This is because of the fast-acting chemical reaction associated with baking soda and the acidic counterpart. When baking soda is combined with acid, CO2 gas bubbles are released, creating the “airy” effect in batter and dough. Furthermore, once the dough or batter starts to bake, the carbon dioxide will begin to filter through the dough and expand air that is trapped inside. The sources of acid combined with the baking soda will determine if the dough or batter can be kept in the refrigerator or needs to be baked immediately.
For example, if the sources of acid are dry, such as cream of tartar or cocoa powder, then they can keep longer once combined with baking soda. However, if the acids are wet, such as yogurt or lemon juice, then the resulting batter will need to be used promptly. Baking soda can also provide dough with increased pH levels, which creates a heightened alkalinity. Through the increase in pH, the gluten in the dough becomes weakened, which creates a tender texture for cookies and pastries versus something chewier such as bread. Quantity is an important component, considering the effect baking soda has on baking recipes.
Baking soda is a versatile product that has many household uses simply by itself or when combined with other products. Due to its coarse salt-like nature, baking soda can be used as a scrub of sorts for fruits and vegetables, grills, countertops and even teeth. Commonly added to many kinds of toothpaste, baking soda is a natural powerhouse cleaning product. Baking soda is widely used as a refrigerator deodorant of sorts because some believe it neutralizes lingering odor. Chemically, baking soda reacts in a similar fashion when it is used in baking recipes such as muffins and scones as it does with odors. This is because baking soda is basic and most odors are acidic, and this provides for a similar atmosphere for a neutralizing reaction to occur.
Baking soda and vinegar are not only baking partners in crime, but also stellar cleaning partners, due to their chemical composition. When combined in baking recipes, baking soda and vinegar (or acid) work together harmoniously to create the leavening process of batters and doughs. Similarly, when combined for cleaning purposes, baking soda and vinegar create an abrasive environment that is tough on stains, dirt, and clogged drains. As previously mentioned, when baking soda is heated above 122°F, it creates carbon dioxide. This is what makes baking soda a great fire extinguisher and why it remains one of best ways to put out a grease fire. The increase of carbon dioxide cuts off the fire’s source of oxygen, creating an environment that is not sustainable for the fire.
Similar to baking soda, baking powder is a leavening agent used in quick-bake recipes. Often confused and mistaken for one another, these two interact within recipes in different ways and are very different in composition. It is important to consider the differences between both baking soda and baking powder when exploring baking recipes. As previously mentioned, baking soda is a leavening agent that, when mixed with acid and liquid, becomes activated and produces CO2 bubbles. Similarly, baking powder is a leavening agent that produces CO2 bubbles. However, the composition is one of the major differences.
Baking powder is composed of baking soda itself, paired with another dry acid, such as cream of tartar. As a result, baking powder has the ability to be single or double acting. Single-acting baking powder performs in a similar way to baking soda that has been combined with an acid. It quickly releases CO2 and creates the leavening process that must be quickly taken advantage of. However, a double-acting baking powder can be activated twice through different means. Once the liquid is added to the baking powder, it becomes activated and produces the CO2 bubbles.
In addition to the first activation, there is a secondary activation that can take place once the solution, or batter, is exposed to heat (placed in the oven). This also creates the ability for an elongated time frame that is not present within the reaction caused with baking soda and acid. This means that because baking powder is activated by liquid and already has the dry acid component (cream of tartar), it can be preserved in the refrigerator longer. This is why items such as cookie dough can remain in the refrigerator, while cake batter must be cooked promptly.
Baking soda is an important and fundamental component of most baked goods and many cleaning products for several reasons. It is the driving force behind the desired consistency and taste of most of our quick-bake treats, and the powerhouse cleaning agent in many of our household products. Through the chemical reaction created by combining baking soda with liquid, acid, and heat, carbon dioxide is created. These tiny CO2 gas bubbles allow for soft and airy baked goods such as cookies, pancakes, and cakes. Baking soda also increases pH levels while reducing gluten. This creates less chewy and more tender baked goods. Though baking soda recipes call for seemingly small amounts, it makes all the difference if you don’t have it. Baking soda has become an integral part of baking recipes and household use, and without it, we may not have the ability to get our fast, fresh-baked, tender, and crunchy cookie fix!

By: RedmanShop | January 6, 2025
After all, people have been baking naturally fermented bread for thousands of years, and it only requires three ingredients: flour, water, and salt. Well, it’s simple, but creating a starter and baking sourdough bread’s not easy — at least not until you develop your own personal process, something that works for both you and your starter.
Everything from the flour you use to the season of the year to whether you’re urban or rural plays into your sourdough bread success — or less-than-success. Talk about variables!
If you’re a new sourdough baker, you may be struggling just trying to get your starter going. The confusion, angst, and even despair that we hear among first-time sourdough bakers out there is truly distressing.
Are you having a rough time with your starter? Let us help. Here are 10 tips directed specifically at brand-new sourdough bakers that should clear up the confusion you’re feeling around not just the starter itself, but the various tools and recipes associated with sourdough baking.
Sourdough starter is a combination of water and flour which, when mixed together, grows wild yeast, produces organic acids, and attracts friendly bacteria. All flours, from whole grain rye to all-purpose white, harbor wild yeast and will cultivate bacteria. But not all flours work the same: some are better right at the beginning of your starter’s life, while others have more to contribute farther along in the process.
Maybe you have a good supply of bread flour but your starter recipe calls for all-purpose (or vice versa). Perhaps the formula lists organic rye flour or golden whole wheat, and you simply don’t have them and can’t get them. No worries; just use what you have.
If your starter calls for all-purpose flour and all you have is bread flour, increase the water a bit; if it calls for bread flour and all you have is all-purpose, decrease the water a bit. And if it calls for whole wheat or rye and you have neither? Your starter may be a bit slower coming to life without the initial “kick” of a whole grain, but eventually it’ll work just fine. (Learn more about how whole grain flours affect starter in our post: Sluggish starter? Add a little whole grain flour.)
One caveat: Bleached flour may eventually yield a decent starter, but due to its natural flora having been killed by bleaching it’ll probably take a heck of a lot longer for a starter made with bleached flour to become fully active.
No, not at all. Our Baking School keeps its starter in food-safe plastic buckets and uses metal spoons or acrylic spatulas to mix it up after feeding. We wouldn’t recommend using a bowl that’ll react with sourdough’s acidity — for instance, don’t mix or store your starter in cast iron or uncoated aluminum — but other than that, glass, plastic, stoneware, acrylic, stainless steel — take your pick, all are acceptable.
No. While chlorine and other chemicals in your treated tap water don’t create the friendliest environment for your starter, there’s no need to make a trip to the store for bottled water.
I’ve successfully used tap water in my starter for years. If your tap water is so heavily treated you can smell the chemicals, try filling an open container and leaving it at room temperature overnight. The next day your water should be good to go.
It’s certainly discouraging to see a starter that’s seemed perfectly happy suddenly turn into a lifeless blob. But it’s OK. As your new starter evolves, one set of bacteria gradually gives way to another; and during that transition, when neither is dominant, your starter will take a rest. Just keep feeding it; within a few days, it should show renewed signs of life.
If you don’t remove some of your starter before feeding it, you’ll soon have gallons of the stuff filling your fridge. So yes, you do have to remove some starter; but you don’t necessarily have to throw it away. Here are your options:
Something with a lid! Seriously, you can go two ways here. If you want to feed and store your starter in the same container, you want one that’s large enough to hold triple your volume of starter. If you’ll be feeding your starter in a bowl and then transferring it to a lidded container to store, the container only needs to be a bit larger than the starter itself. It’s handy to use a clear glass or translucent plastic container if you’ll be letting your starter rise in it, so you can track its progress. (Our glass sourdough crock is a preferred option.) Stoneware, plastic, stainless steel, and enameled metal are also suitable materials.
Whatever vessel you choose, the lid should fit securely, simply to prevent potential spillage if you knock the container over. But you don’t want anything airtight: it’s not necessary and could potentially result in a messy blowout.

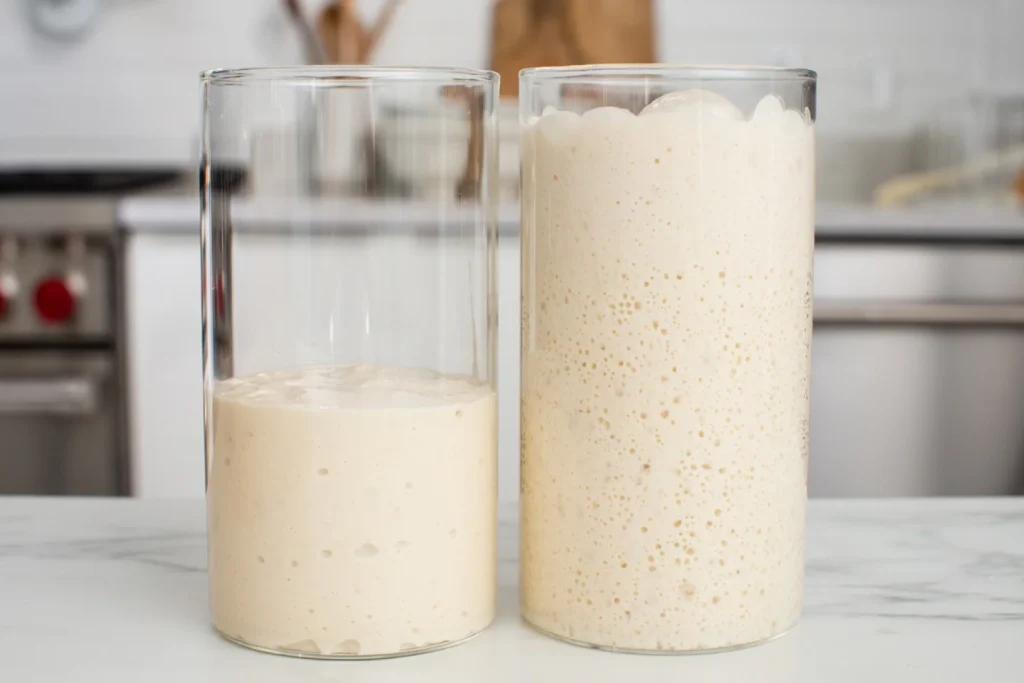
Not if you’re going to use it to leaven bread! A fed starter should double in size within 6 to 8 hours, or it probably won’t be strong enough to raise your dough.
Sometimes starter is so thin and liquid-y that there’s not enough structure for it to expand; bubbles simply rise and escape. If your starter seems thin (easily pourable rather than gloppy), try feeding it a bit more flour until it thickens up; alternatively, you can feed it with higher-protein (higher-absorption) bread flour. This might be just what it needs to start growing up, rather than fizzling out.
No, you almost certainly didn’t. While sourdough starter can die under extreme circumstances (e.g., having been fed with boiling water), it’s actually really hard to kill. It may be poky and slow; it may not look like you think it should. But it’s not dead. Keep feeding it on a regular schedule and eventually, it’ll start bubbling again.
Now, sourdough starter can very rarely become “infected” with mold or an evil bacteria, in which case you won’t want to bake with it. If your starter shows evident signs of mold or if it develops a pink/orange tinge, it’s time to discard it and start again.
When it comes to how your starter smells, it’s fairly common for a fledgling starter to go through a stinky period (think teenagers’ sneakers), but an established starter should never smell awful. That being said, if you’ve neglected your starter in the refrigerator longer than usual and it smells a little off, a few days of room-temperature feedings will likely restore it to its usual pleasant aroma.
For more on how to assess your starter’s health see our post, Sourdough starter troubleshooting.
No. These all come under the heading of nice to have, but not necessary.
A banneton (a.k.a. brotform) is simply a round or oval basket that holds dough as it rises. The risen loaf is then turned out onto a baking stone, a baking sheet, or into a Dutch oven to bake. It’s useful for doughs that are quite soft and need support, keeping them from flattening out as they expand.
You can actually fashion your own rising vessel from a bowl and smooth dish towel, for soft dough. For a stiffer dough, simply allow the loaf to rise on a piece of parchment (which makes it easy to transfer to a hot baking stone); on the baking sheet on which you’ll bake it, or even in your Dutch oven if you decide not to preheat it first.
Rice flour is used to flour your banneton; it’s “slipperier” than regular all-purpose or bread flour and offers better release of the potentially sticky dough but again, not necessary.
A Dutch oven or other closed container is a real boon if you enjoy bread with excellent loft and supremely crusty crust. The container’s lid catches steam from the baking loaf, keeping its top crust soft and allowing it to expand fully. That same steam makes the crust crackly-crisp once the loaf has finished rising and the bread starts to brown.
Yes, a Dutch oven is great to have; see the details here: Bread baking in a Dutch oven. But you can certainly bake a lovely loaf without one.
Our Rustic Sourdough Bread is perfect for beginners. Since it includes a bit of commercial yeast as well as sourdough starter, you don’t have to worry about your starter being totally up to snuff: Call it the belt and suspenders approach. While sourdough purists will argue that using commercial yeast disqualifies your bread as “true” sourdough, hey, what’s in a name? If you enjoy a light-textured, crusty loaf with lovely tang, this one’s for you.
Our Naturally Leavened Sourdough Bread includes no commercial yeast, and relies entirely on a strong starter for its rise. So if you choose this recipe make sure your fed starter is very healthy and active, doubling in size within 6 to 8 hours of feeding. If your starter is ready to go, expect to make a loaf with great crust and chew, and deep, rich sourdough flavor.
The wild yeast and friendly bacteria that bring sourdough starter to life are fickle, just like all living organisms. Sometimes they’re full of energy and ready to rise and shine; other times they need coddling and cajoling. It’s up to you to figure out what your starter needs — and when — in order to keep it happy and working for you.
It sounds daunting, but don’t be discouraged. Gradually, as you learn what works in your kitchen (rather than what works for that guy on YouTube or your best friend in Seattle) you’ll relax and realize that hey, sourdough bread’s not that complicated after all. It’s flour, water, salt, and time — both the hours it takes your loaves to rise, and the days you spend learning about this ancient craft through practice, practice, and more practice.
Now, take a deep breath and relax. Your ego should never be tied to how many Instagram likes your bread photo gets, nor should you be discouraged by bread bullies on Facebook dissing that loaf you were so proud of. Always remember: there are no baking police. Plain and simple, if you’re happy with the sourdough bread you bake, it’s a success.
Get the latest recipes, products and classes available on RedManShop.
You have successfully subscribed