


How to make chocolates in a mould
By: izzah zainal | February 7, 2025
Eager to get started on those beautiful moulded chocolates? This step-by-step breakdown will help you achieve the perfect end result.
Good To Know:
What should you take to heart when making moulded chocolates?
Use polycarbonate moulds. These yield the best gloss and contract slower than chocolate, making unmoulding far easier. Choose a fluid chocolate: a three-drop or four-drop fluidity is ideal. Heat the moulds briefly before pouring in your chocolate. This way, you’ll avoid temperature shocks that could make your chocolate turn grey afterwards.
Make sure that your filling is smooth and fluid enough to pipe easily. Also check that it isn’t warmer than 28°C, otherwise the filling will make your chocolate shells melt. Try to avoid making smudges on the rims of your chocolate moulds with the filling as they may cause leaks in your chocolate shells. Always fill each chocolate shell individually. Never fill the chocolate shells to the brim. Leave a 1.5-mm opening from the top, otherwise it would be impossible to seal your chocolates properly.
Needed:
- Moulds for chocolates (pralines), preferably in polycarbonate
- A ladle
- Chocolate melter or tempering machine
- A small palette knife
- A chocolate scraper
- Sheet of paper
Step 1
Temper the melted chocolate.
Step 2
Warm your chocolate mould with a heat gun to a temperature of 26 to 27°C, but make sure it doesn’t become warmer than your tempered chocolate.
Step 3
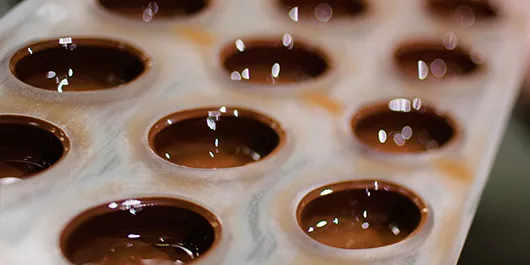
Fill the mould with tempered chocolate. Hold the mould at an angle and scrape off the excess chocolate from the top and sides of the mould.
Step 4
Tap the mould firmly against your worktop to remove any air bubbles from the chocolate.
Step 5
Pour the chocolate back into the melter, but make sure that all sides and corners of the mould cavities are evenly covered with chocolate.
Step 6
Scrape off the excess chocolate from the top and sides of the mould again.
Step 7
Let the chocolate set for about 5 minutes: put the mould on a sheet of paper with is open side facing down and allow the excess chocolate to drip onto it (until the dripped out chocolate begins to set).
Step 8
Scrape off the excess chocolate one last time and leave the chocolate to harden in a refrigerator at 14 to 16°C for a few minutes. The chocolate shells are then ready to be filled with a ganache, praline or other filling.Which type of chocolate is best suited to create moulded chocolates?
For a medium thick chocolate shell:
All chocolate types with a basic three-drop fluidity are right about perfect. They make it easy to create a chocolate layer with the perfect thickness and minimise the chance of having unwanted air bubbles, especially in comparison with more fluid chocolates.
For a fine chocolate shell:
Some chocolate lovers and craftsmen want the chocolate shell of their moulded chocolates to be as fine and crunchy as possible. A more fluid chocolate with a 2% to 4% higher cocoa butter content is absolutely perfect for this. You can easily recognise these types of chocolate by the four-drop symbol indicated on their packaging.