FREE DELIVERY ABOVE $60

Recipes > Extra Tangy Sourdough Bread

Extra-Tangy Sourdough Bread

Recipes > Extra Tangy Sourdough Bread

Extra-Tangy Sourdough Bread

Recipe by RedmanShop

This bread, with its mellow tang, is perfect for those who like their sourdough bread noticeably sour, but not mouth-puckeringly so. The signature sourdough flavor comes from a combination of lactic and acetic acids, created as the dough rises and ferments. Refrigerating the dough encourages the production of more acetic acid, which is the tangier of the two. Thus, this bread with its refrigerated starter has the ideal balance of sour flavor.

Save Entire Page as PDF

Prep

15 mins

Bake

30 mins

Total

45 mins

Yield

2 loaves

  • Ripe (fed) Sourdough Starter 1 cup (227g)
  • Water, lukewarm 1 1/2 cups (340g)
  • Unbleached All-Purpose Flour 5 cups (600g), divided
  • Table Salt 2 1/2 teaspoons

Featured Products

Instructions

Bake Mode

Prevent your screen from going dark as you follow along.

  1. To make the dough: In a large bowl or the bowl of a stand mixer, stir together the starter, water, and 3 cups (360g) of the flour using the flat beater attachment. Beat vigorously for 1 minute.
  2. Cover and let rest at room temperature for 4 hours. Refrigerate overnight, or for about 12 hours. The dough will have expanded in size and become more relaxed after its overnight rest.
  3. Add the remaining 2 cups (240g) flour and the salt. Stir to thoroughly combine, then knead (by hand, or with a stand mixer equipped with the dough hook) to form a smooth dough.
  4. Allow the dough to rise in a covered bowl until it’s light and airy, with visible gas bubbles. Depending on the vigor of your starter and the temperature of your kitchen, this may take up to 5 hours (or even longer). For best results, gently deflate the dough once an hour by turning it out onto a lightly floured or lightly greased work surface; stretching and folding the edges into the center; turning it over, then returning it to the bowl. Adding these folds will help strengthen the dough’s structure, and allow you to feel how it’s progressing over time.
  5. To preshape: Transfer the dough to lightly floured or lightly greased work surface. Gently divide it in half.
  6. Gently pat the dough to deflate it slightly and remove any large air bubbles. To make a loose round, stretch the outside edge of the dough away from itself and then fold it back toward the center, pressing it down to seal. Repeat this process five or six times, working your way around the dough until all the edges are gathered in the center. Turn the dough over so the seam is facing down, cover, and repeat with the other piece of dough. Let the dough rest, covered, for about 10 minutes.
  7. To shape into bâtards: Place the preshaped dough on a lightly floured surface and stretch it gently from the top and bottom, elongating it into an oval. Gently pat the dough to remove any lingering bubbles.
  8. Fold the top third of the dough down toward the center, as if folding a letter. Press with the heel of your hand to seal. Then fold the left and right top corners toward the center at 45° angles, pressing to seal. Repeat this process a second time. Then fold the dough in half, bringing the top edge to meet the bottom. Seal the seam with the heel of your hand, pressing firmly where the two edges meet.
  9. Turn the dough over so the seam is facing down. With cupped hands, gently roll the dough back and forth; your fingertips should be lightly touching its surface as you roll. Move your hands from the center out toward the edges, rounding the dough and tapering the ends very slightly by using more pressure.
  10. Place the bâtards on a lightly greased or parchment-lined baking sheet.
  11. Cover and let rise until very puffy, about 2 to 4 hours (or longer; give them sufficient time to become noticeably puffy). Don’t worry if the loaves spread more than they rise; they’ll pick up once they hit the oven’s heat. Toward the end of the rising time, preheat the oven to 425°F.
  12. Spray the bâtards with lukewarm water; this will help them rise in the oven by keeping their crust soft and pliable initially. For an extra-crusty crust add steam to your oven: see details in “tips,” below.
  13. Slash the bâtards. Try one slash down the length of the loaf, two diagonal slashes, or another symmetrical pattern of your choice. Make the slashes fairly deep; a serrated bread knife or lame, wielded firmly, works well here.
  14. Bake the bâtards for 25 to 30 minutes, until they’re a very deep golden brown. Remove them from the oven and cool on a rack.
  15. Store bâtards, loosely wrapped, for several days at room temperature; freeze for longer storage.

Similar Recipe

Italian Sesame Loaf

Tips

  1. Looking for a more sour/tangier loaf? Try adding 1/2 teaspoon to 5/8 teaspoon sour salt (citric acid) to the dough along with the regular salt.

  2. To serve as pictured above, split a loaf around the perimeter, and layer one half with oil-packed sun-dried tomatoes (or oven-roasted cherry tomatoes) and fresh basil leaves.
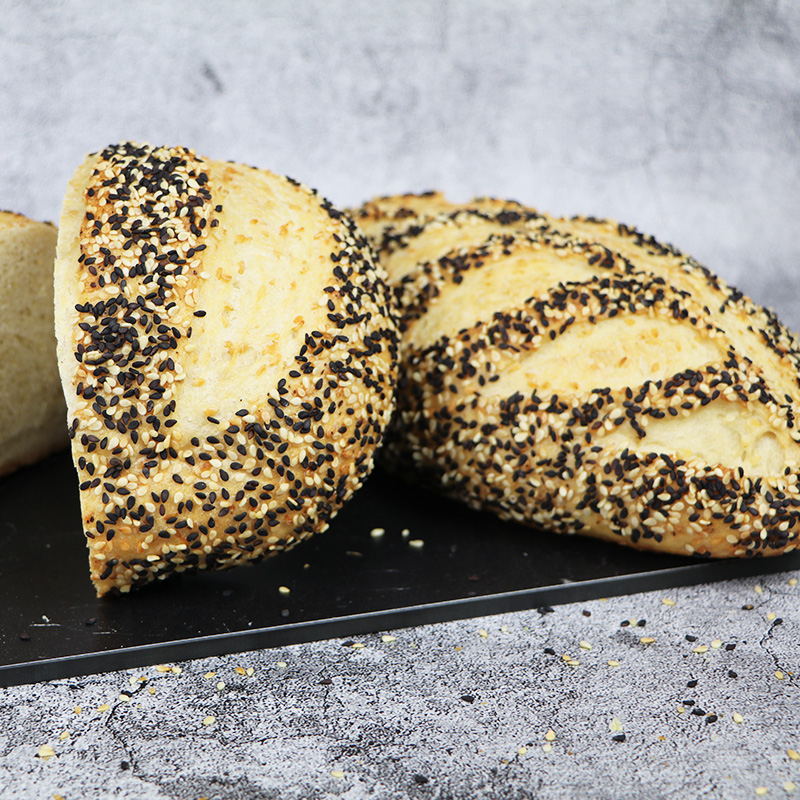
  3. For extra-crusty crust, add steam to your oven as follows: While the oven is preheating, place an empty cast iron frying pan on the oven rack below the stone. If possible, adjust stone and pan so that the pan isn’t directly under the stone, making it easier for steam to reach the baking bread. Once you’ve placed the bread in the oven, pour about 1 cup of boiling water into the cast iron frying pan. Steam will billow from the pan upward to envelop the baking bread; be sure to wear good oven mitts to shield your hands and arms. Quickly close the oven door to trap the steam.

Bake of the Week

Pennoni Millerighi with Pepper Cream

Submit your review
1
2
3
4
5
Submit
     
Cancel

Create your own review

RedManShop
Average rating:  
 0 reviews

Shop This Recipe

FINE SALT (#12581)

25.95

ALL PURPOSE FLOUR 1KG (#104681)

5.25

Subscribe to our Newsletter Now

Get the latest recipes, products and classes available on RedManShop.